Handbook of Wool Knitting
and Crochet
Published by
Needlecraft Publishing Company
Augusta, Maine
1918
12c
12c
You can crochet the most fascinating
things imaginable if you have this
Handbook of Crochet
By Emma Chalmers Monroe
This book is equally appreciated by beginner or expert. It contains
most valuable information and instructions for everyone who crochets
or wishes to learn to do this beautiful work. It embodies a very
careful selection of designs; and, from the simplest to the most ornate,
every successive step is explained and illustrated so fully that perfect
results are a certainty.
It describes the making of the newest designs for the ever popular use of
crochet and gives instructions and patterns for Edgings, Borders, Scarf-Ends,
Insertions, Yokes, Lunch-Sets, Doilies, etc.
The book has twenty-eight pages (size 7×10 inches) and 44 illustrations.
It is printed on a fine quality of paper with the cover in colors.
Your copy of Emma Chalmers Monroe’s Handbook of Crochet will be
sent you, prepaid, upon receipt of 12 cents, stamps or coin. It can be
obtained only from us.
Needlecraft
Augusta—Maine
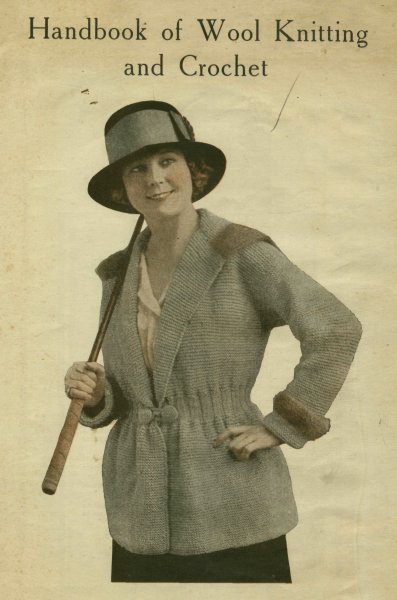
Handbook of Wool Knitting
and Crochet
A Lesson in Knitting
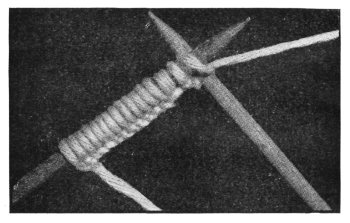
The first thing to be done in knitting is to cast on or, as it is
sometimes called, to “set up the foundation.” (Figure
1). There are several methods for this, the following being
that preferred and generally used by the writer: Leave
a spare end of thread, sufficient for the number of stitches
you wish to cast on, lying toward the left, the spool or
ball from which the working-thread is drawn being at the
right. Lay the thread between the little finger and the
third of the left hand; bring the working-thread across
the palm of the hand, around the thumb and back
between the forefinger and second finger; bend the
forefinger over this thread (which passes between it and
the second finger), pass it under the thread which crosses
the palm of the hand, and then draw the forefinger back,
or straighten it, which will give you a loop with crossed
threads. Put the needle under the lower part of this
loop, which draws from the ball, bring the working-thread
(or ball-thread) around the point of needle from right
to left, as in plain knitting, draw it back through the loop,
slip off the latter, and draw up the left thread. Then proceed
to make the crossed loop and knit it off in the same
way for the next and following stitches. The whole operation
is very simple, although the instructions seem long because
explicit. Take your needle and yarn or thread and
follow them through carefully, and you will very soon master
the “crossed casting on.”
Another method, preferred by many and practically the
same in effect, except that the edge is not quite so firm, is
as follows: Loop the thread around the left forefinger,
holding the spare end between thumb and second finger,
pass the needle upward through the loop, pass the thread
around the point, draw back through the loop, slip off the
latter and pull up the spare thread. By passing the needle
under the loop, or lower thread, instead of through it,
bringing it back through, and then knitting off, you will
really get the crossed loop, and many find this method
easier than the first. The thread used in casting on may be
doubled, particularly for beginning a stocking, mitten, or
any article where much wear comes.
Casting on may also be done with two needles, and many
like this method when there are many stitches. Twist a
loop around the needle held in the left hand, bring the end
of thread, or spare thread, to the front, crossing the working-thread
to hold it in place—or, if preferred, simply tie
a slip-knot and put the loop on the left needle; insert the
right needle through this loop from left to right, put thread
around point of right needle and draw through the loop,
bringing the right needle again in front of left. Thus far,
the process is quite like that of plain knitting. Keeping the
right needle still in the new stitch or loop, transfer the
stitch to the left needle by bringing the latter in front and
putting the point through the loop from front to back,
leaving the right needle in place for the next stitch; the
loops are not slipped off, as in knitting plain, but transferred,
so that all are kept on the needle. A little practise
will enable one to cast on thus very rapidly and evenly.
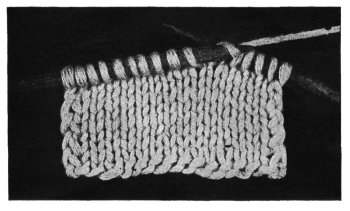
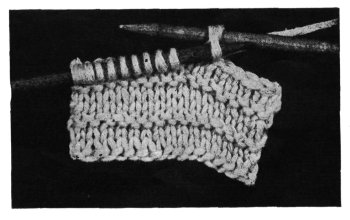
The plain knitting (Figure 2), is
done as follows: Having cast on the
requisite number of stitches, insert the
right needle through the front of left
needle from left to right, the right
needle passing behind the left;
carry the thread around point
of right needle and bring it down
between the two needles, then draw
the point of right needle back and
through the stitch, forming the new
stitch on right needle and letting
the other slip off the left, pushing
down the point of left needle to facilitate
this process; repeat until all
the stitches are knitted off and the
row is complete. Where there are
edges to be joined, as in knitting back
and fronts of a sweater, it is a good
plan to slip the first stitch of each
row.
Right here a suggestion about the
method of holding the thread may be
of value: By the first method the
thread is carried over the little finger
of right hand, under second and
third fingers and over the tip of the
forefinger, which should be held close
to the work; it is this finger which
passes the thread over point of right
needle for the new stitch. By
another method the thread is carried
over the left forefinger, under second
and third and over the little finger,
exactly as it is held for crocheting:
insert the right needle through 1st
stitch on left needle in usual way,
push it over the thread on left forefinger,
and draw this back through
the stitch with the point of right
needle. Only the needle is held in
the right hand, and many workers
claim that the work is much more
rapidly done.
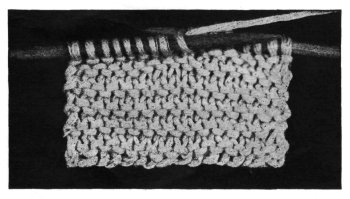
The purl- or seam-stitch (Figure
3) is the exact reverse of plain knitting,
both as to method of work and
appearance, being in reality the wrong
side of plain knitting. In the latter
the thread is kept at the back of
the work; for purling, bring it to the
front between the two needles. Put
the point of right needle through the
front of 1st stitch on left needle from
right to left, the right needle being
thus brought in front of the left; pass
the thread around the front of right
needle from right to left and back
between needles, then push down
the point and draw the loop backward
through the stitch, instead of
forward, as in plain knitting, the
right needle being thus brought
behind the left. Slip off the old
stitch as usual, and take care to
return the thread to its place at the
back before beginning to knit plain
again.
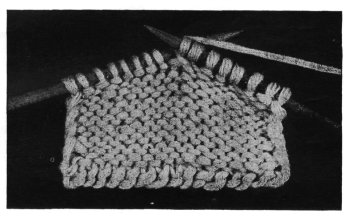
Garter-stitch, so called (Figure 4)
is simply plain knitting back and
forth, which gives the effect of ridges,
one row knit, the next purled. This
is a stitch much used for sweaters,
and other knitted garments. If one
wishes to have the right side appear
as in plain knitting, the 1st row
must be knitted plain, the next
purled. Since one is the reverse of
the other, the right side will be plain
knitting, the wrong side purled.
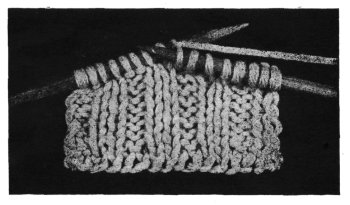
The rib-stitch is alternately plain
and purled. To knit the single rib,
* knit 1, purl 1; repeat. For double
rib, (Figure 5,) * knit 2, purl 2;
repeat; and for triple-rib, * knit 3,
purl 3; repeat. Any width of rib
may be made that is liked, always
taking care—unless knitting in
rounds, as a wristlet, mitten or stocking—to
knit the stitches purled on
the preceding row, and purl the knitted
ones. There are a large variety
of fancy patterns made by combining
plain knitting and purling, such as
the basket-stitch and others, of even
or broken “check.”
There are many variations of the
simplest stitches; for example, the
common garter-stitch gives a particularly
good effect if knitted from
the back. Put the needle in from
right to left, through the back part of
the stitch to be knitted; leave the
thread behind the needle, then pass it
from right to left over the needle and
draw it through the stitch, allowing
the latter to slip off as in plain knitting.
In this stitch the two threads
of the loop are crossed, instead of
lying side by side as in plain knitting.
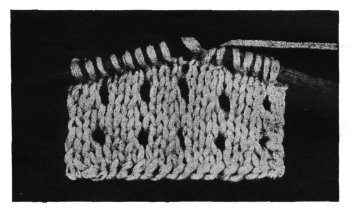
“Overs” (Figure 6) are used in all
lace patterns, and many times in
fancy designs for wool knitting. To
make an “over” bring the thread
before the needle as if to purl, then
knit the next stitch plain as usual.
This brings a loop over the needle,
which in the next row is to be
knitted as any stitch, thus increasing
the number of stitches in the row.
In case it is not desired to increase
the stitches, one must narrow, by
knitting two stitches together, once
for every “over.” If a larger hole is
wanted, the thread is put twice over
the needle, and in the following one
of these loops is knitted, the other
purled.
To “purl-narrow,” or purl two
together, bring the thread to the front
as for purling, then to form the
extra stitch, carry the thread back
over the needle and to the front again;
then insert the right needle through
two stitches instead of one, and knit
them as one stitch. “Fagot” is an
abbreviation frequently used for
this.
To slip and bind, slip 1st stitch
from left needle to the right needle,
without knitting it; knit next
stitch, then draw the stitch on
right needle over the knitted one,
letting it fall between needles. To
slip, narrow and bind, slip first stitch,
knit next two together, and draw the
slipped stitch over. To cast off or
bind off, (Figure 7,) slip 1st stitch,
knit next, draw slipped stitch over,
knit next stitch, draw the previous
knitted stitch over, and continue,
taking care that the chain of stitches
thus cast off be neither too tight nor
too loose, but just as elastic as the
remainder of the work.
A Sleeveless Sweater
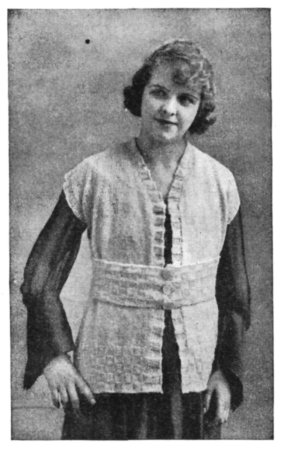
A Sleeveless Sweater
A sleeveless sweater,
as pretty as it is comfortable,
requires six skeins of
Shetland floss and a pair of No.
5 amber needles. Pink floss
was chosen for the model, but
any preferred color may be
substituted.
Cast on 85 stitches; knit
in basket-stitch, as follows:
1. * Knit 5, purl 5; repeat
across, ending with knit 5.
2. Purl 5, knit 5; repeat
across, ending with purl 5.
Repeat these two rows
twice, making 6 rows in all;
then to change the check knit
7th row like 2d, 8th like 1st,
repeat twice, and again change
the check by repeating from
1st row. Continue until the
border is five checks deep, or
30 rows.
Knit across plain and purl
back for 84 rows; narrow 1
stitch each side every other
row, three times, for the armhole,
leaving 79 stitches on
your needle, and giving 89
rows from the border. Knit
across plain and purl back for
38 rows; putting these stitches
on a large safety-pin for convenience,
knit 31, bind off 17
stitches for neck, and on the
remaining 31 stitches, knit 6
rows back and forth, or 3 ribs,
to give the effect of a seam on
the shoulder. Continue the
front, knitting across and
purling back, adding a stitch
toward the front each time to
make the neck V-shaped, for
38 rows; then add 1 stitch at
the armhole, and next row
cast on 8 stitches for underarm.
Do not widen further
toward the front, but continue
knitting forward and purling
back for 85 rows; then
make the border of 30 rows,
five checks wide, to correspond
with the back, and bind
off. Knit the other front to
correspond.
Pick up the stitches around
armhole, 80 in all, and knit 5,
purl 5 for 6 rows, making an
edge of checks; bind off. Pick
up the stitches on front, to the
center of back of neck, about
175 in all, make a row of checks
to correspond with the arm,
and bind; work a border in
the same way on other side of
front, and sew neatly at back
of neck, also join the underarm
seams, taking care to
match the checks of the
border perfectly.
For the belt: Cast on 25
stitches, and proceed as directed
for the border until you
have the desired length; the
belt illustrated is 42 checks
long. Across one end crochet
3 chain loops, filling these with
doubles, and sew to the other
end three pearl buttons to
match. The belt is caught
along the top in the back, giving
the short-waisted effect.
Costume for the Winter-Girl
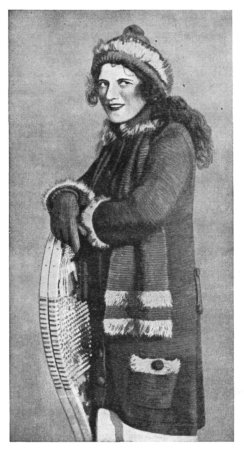
Costume for the Winter-Girl
Materials: Thirteen skeins of Shetland floss (dark
rose was used for the model, but any preferred color
may be substituted), three balls of gray Angora, one pair
each of bone knitting-needles, No. 3 and No. 5, and a steel
crochet-hook, No. 6.
For the sweater: Using No. 5 needles, cast on for the
back 100 stitches (these will measure 20 inches). Knit
plain, back and forth (which will give you ridges or ribs)
for 2 inches; then decrease a stitch at each end of needle
every 8th row, to shape the back, until there are 76 stitches
on the needle, measuring 15 inches (this is the waistline);
knit on these stitches for 9½ inches from the waistline, then
decrease 1 stitch at each end of needle every other row for 3
times, or until 70 stitches remain, and knit on these stitches
until the back measures 15½ inches from the waistline.
Knit 25 stitches off on a spare needle, bind off 20 stitches
for back of neck, and on the other 25 stitches knit one front
after the following directions, and the other to correspond.
Front: Knit in ridges as usual, increasing 1 stitch
toward the front every other row until you have added 6
stitches; cast on 7 stitches more toward the front, giving 38
stitches on the needle; knit in ridges, increasing 1 stitch
toward armhole every other row until 12 stitches have been
added, then cast on 10 stitches toward the underarm, making
60 stitches on the needle (about 12 inches). Knit on
the 60 stitches for 9½ inches, then increase 1 stitch every
8th row toward the underarm- or side-seam, until the latter
is of the same length as that of the back, including the 2
inches. Do not bind off. Knit other front to correspond
and sew up side-seams.
With a needle pick up 1 stitch from each ridge on front
(have an uneven number of stitches on needle), and on another
spare needle pick up the stitches across the back; on
another pick up the stitches of front, having the same
number of stitches on needle; tie a thread in 1st stitch on
needle at bottom of each front, toward the front, which
will be the corner stitch.
1. With bone needles No. 5 start at top of left front,
knit 1, * over, narrow, repeat from * to the corner stitch,
over, knit the corner stitch, again repeat from * to next
corner, over, knit corner stitch, repeat from * until but 1
stitch remains, over, knit last stitch.
2. Knit plain, each “over” forming a stitch to take the
place of narrowed one.
3. Knit to corner stitch, over, knit corner stitch, over,
knit to next corner stitch, over, knit corner stitch, over, and
knit plain to end of row.
Repeat 2d and 3d rows until there are 4 ridges or 9 rows
from the beginning.
In next row make the buttonholes thus: Knit 2 stitches
from the neck, bind off 4 stitches for the buttonhole, then
knit 13, bind off 4, and repeat, making 8 buttonholes 13
stitches apart. In next row cast on 4 stitches over where
they were bound off, then repeat 2d and 3d rows for 4 more
ridges, and bind off.
Sleeves.—Cast on 34 stitches (about 7½ inches); knit in
ridges, casting on 2 stitches at each end of needle every
other row until there are 74 stitches on needle (about 15
inches), knit 1 inch, then decrease 1 stitch at each end of
needle every 12th row until there are 56 stitches remaining
on needle, knit on these until the sleeves measure 17 inches,
or desired length, (knit 1 row, purl 1 row) twice, knit 13
ridges for cuff, then with gray Angora and No. 3 needles
knit 7 ridges, bind off, and sew up sleeves and cuffs.
Collar.—Using the dark rose pick up 84 stitches around
neck of sweater (not the border), knit 30 ridges; do not
bind off. With a spare needle pick up 1 stitch from each
ridge on each end of
collar; with gray Angora
and No. 3 needles repeat
3d and 2d rows alternately
for border until
there are 7 ridges, and
bind off.
Pockets.—Cast on 28
stitches; knit in ridges
for 4 inches, change to
Angora and No. 3
needles, knit 7 ridges,
making a buttonhole in
4th ridge at center of
pocket, bind off and sew
the pocket neatly in
place on the sweater.
Sew the sleeves in.
Belt.—With dark rose
cast on 23 stitches
(about 4½ inches), knit in
ridges until the belt is the
width of the back at
waistline, bind off and
sew in place with two
buttons at each side.
Buttons.—With dark
rose, chain 3, turn; miss
1 stitch, 8 doubles in
next; 2 doubles in each
of 8 doubles; * 2 doubles
in 1st double, 1 in next;
repeat from * until the
circle is of a size to cover
the mold, work 1 row
without widening, slip
the mold in, * work
around with 1 double in
a stitch, miss 1, repeating
from last * until
closed. If preferred, a
small square may be
knitted like the body of
the sweater and used to
cover mold.
The skating-cap is 23
inches head-size, and requires
three skeins of the
dark-rose floss, two balls
of gray Angora wool and
4 steel needles No. 8.
Using the Angora wool,
cast on 136 stitches; knit
45 on each of 2 needles
and 46 stitches on the 3d,
and knit in single rib
(knit 1, purl 1) in rounds
for 1½ inches, change to
the rose floss and knit in
single rib for 1 inch; change to Angora, again knit in single
rib for 1½ inches; change to rose floss and knit in single
rib until the top measures 14½ inches, then bind off and
draw together, leaving sufficient opening for the tassel to
be sewed in.
Tassel.—Using the rose floss, cut about 40 strands 8
inches long, tie in the center, fold where tied and tie again
below. Sew the tassel at top of cap.
Scarf.—Materials required are four skeins of dark rose
Shetland floss, two balls of gray Angora wool, and one pair
each of No. 3 and No. 5 bone knitting-needles. With gray
Angora wool and No. 3 needles cast on 60 stitches, and
knit 7 ridges; change to rose floss and No. 5 needles and knit
7 ridges, change to Angora wool and No. 3 needles, and
again knit 7 ridges, change to rose floss and No. 5 needles
and knit for 50 inches, or length of scarf desired; then, as at
beginning, knit 7 ridges of Angora, 7 ridges of rose and
again 7 ridges of Angora; bind off.
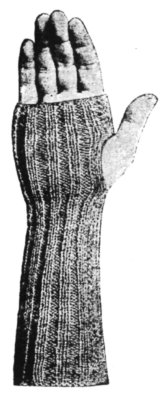
Knitted Gloves.—Materials required are three skeins of
Shetland floss, and four steel knitting-needles, No. 12. Use
two threads of the floss at once.
Cast 16 stitches on each of 3 needles. Knit in single rib
(knit 1, purl 1) for 44
rounds, or until the wrist
is as long as desired, then
knit 16 rounds plain.
61. Knit to within 4
stitches of end of round,
widen 1, knit 4, widen 1.
62, 63, 64, 65. Knit
plain.
Repeat the last 5
rounds, increasing 2
stitches every 5th round
until you have 10 stitches
between the two widening
points, and 58
stitches on the needles.
To form the thumb,
knit 7 stitches on each
of 2 needles and cast on
4 stitches between the
widening points, thus
making 18 stitches on 3
needles.
Knit 22 rounds plain.
* Narrow, knit 1; repeat
around; knit 1 round
plain; repeat from *.
Narrow until the thumb
is closed, draw the wool
through, and leave an
end to fasten down on
the wrong side.
Pick up the 4 stitches
cast on at base of thumb,
making 48 stitches on
the hand. Knit 15
rounds, then divide the
stitches as follows: Slip
24 stitches on one knitting-needle
for top of
hand starting from the
3d cast-on stitch at beginning
of thumb, and
the remaining 24 stitches
for palm of hand on
another needle.
First Finger: Knit 6
stitches from top of hand,
slip remaining 18
stitches on a safety-pin,
also 18 stitches from
palm of hand on another
safety-pin, cast on 3
stitches for between
fingers, knit remaining
6 from palm of hand,
making 15 stitches in
all, on these knit 30
rounds, and finish off as
directed for the thumb.
Second Finger: Knit 7 stitches from back of hand, cast
on 3 stitches, knit 6 stitches from palm of hand, and pick
up 3 stitches cast on at base of first finger, making 19
stitches on needle; * knit 1 round plain; knit to last 2
stitches of round, which will be 2 of the stitches picked up,
narrow; repeat from * twice, and on the 16 stitches remaining
knit 28 rounds more, 34 rounds in all; narrow off like
the thumb.
Third Finger: Knit 6 stitches from safety-pin at top of
hand, cast on 3 stitches, knit 6 from palm of hand, and pick
up 3 stitches at base of second finger, making 18 stitches in
all; knit 1st 6 rounds as directed for 2d finger, knit 25 more
rounds on remaining 15 stitches, and narrow off as thumb.
Fourth Finger: Knit 5 stitches from back of hand on 1
needle, 6 stitches from palm on another, pick up 3 stitches
at base of 3d finger on 3d needle, knit 26 rounds on the 14
stitches, then narrow off as the thumb.
These directions are for the left glove. Knit the right
glove in same way to where you divide the stitches for the
fingers; then remember that the palm of the glove must be
toward you, the thumb on the right-hand side. So you
would first knit 6 stitches from palm, cast on 3, and knit 7
from back of hand, reversing directions as given for left
glove.
Children’s Knitted Sets
Set No. 1
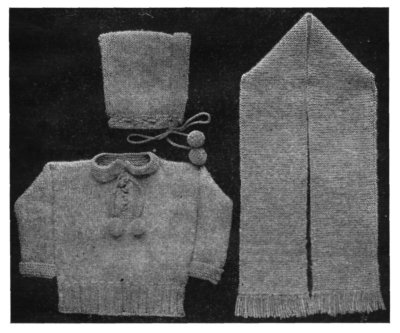
Set No. 1
Hood.—Cast on 80 stitches, and knit back and forth for
70 rows, or 35 ribs; then join the color and knit 6 ribs,
and bind off evenly. Sew up the edge where you cast on for
the back of the hood. Fold the border back its width, and
pick up the stitches across end of this and the 6 ribs back of
it on the body of hood, then the stitches around neck and
the other side of border, knit 3 ribs, then in next row, knit
4, over, narrow, and repeat, ending with knit 3. This row
forms the holes for the cord. Knit back plain, knit 3 more
ribs and bind off.
The hood may be of any desired size by casting on any
number of stitches, and knitting just half that number of
ribs.
Scarf.—Cast on 30 stitches (or 35 for a little wider scarf);
knit 14 ribs of blue, 3 of gray, 2 of blue, 1 of gray and 2 of
blue; then knit 34 inches of gray, 2 ribs of blue and continue
with the other end as at first, reversing the order. Knot
fringe of the two colors in at each end.
Sweater.—Cast on 60 stitches, and knit 2, purl 2 (or
double rib) for two inches. Knit plain for 100 rows (or 50
ribs, if you knit back and forth; the model was knitted forward
and purled back, to give the work the appearance of
plain knitting on the right side). Cast on 42 stitches for
sleeve, knit back and cast on 42 stitches for the other
sleeve; knit 30 rows on this length, then take 65 stitches
off on an extra needle, bind off 14 stitches for neck, and on
the remaining 65 stitches work 12 rows; then cast on 13
stitches toward the front and on this length knit 28 rows,
bind off 42 stitches for the sleeve, work 18 rows on the
remaining stitches, slip these on an extra needle, work the
other front to correspond, slip all the stitches on one
needle, knit until the front is as long as the back, and
finish with the double rib for two inches; bind off evenly.
Using the color, pick up the stitches at the end of sleeve
and knit back and forth for 12 rows; bind off. Sew up the
sleeves and underarm seams and turn back the cuffs.
For the collar pick up the stitches around the neck,
knit 8 rows of gray, then 6 rows of color, and bind off.
Work around edge of collar and down the front opening
with double crochet, 1 chain between; lace up the front with
cord, ends finished with balls or tassels.
Set No. 2
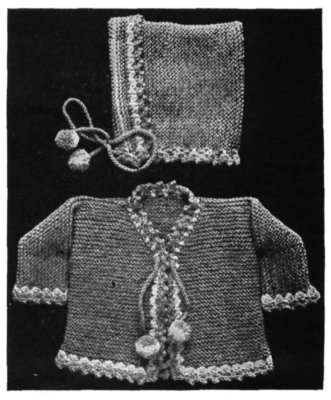
Set No. 2
Jacket.—Cast on 52 stitches and knit 60 rows or 30 ribs;
cast on 26 stitches for sleeve, knit back and cast on 26
stitches for the other sleeve. Knit 34 rows, then knit 43
stitches, bind off 18 stitches for the neck, knit remaining 43
stitches, and on these continue with the front. Knit 6 rows,
then continue knitting back and forth, adding a stitch at
the end of each row toward the front for 22 rows, which will
give 11 extra stitches; knit 6 rows without widening, then
bind off 26 stitches, and knit remainder of front to correspond
with the back.
Knit the other front in same way, sew up sleeves and
underarm seams, work around the neck with double crochet,
in color, 1 chain between, and around the body of the
jacket with shells of three trebles in a stitch, miss space of
two ribs; repeat. With the gray make 2 trebles, picot of 3
chain caught in last treble and 1 treble around neck, and
between 1st and 2d trebles of shells around body of jacket.
Finish edge of sleeves in the same way, and run in cord and
balls.
For the Hood.—Cast on 64 stitches, knit 28 ribs, then 2
ribs of color and 2 of gray; bind off, sew up the back of hood
where cast on, finish around the neck with double crochet,
space of 2 chain between, using color, work the shells around
front of hood, and finish with the shells of gray, as for
jacket. Run in the cord, with balls of the two colors of
yarn.
The cords may be done in plain crochet, the ordinary
chain or, as preferred because stronger, knotted by what is
called the “fool’s delight” method, although why named
thus it is impossible to say. Surely it seems a very sensible
way: Take a length of yarn six times as long as the cord is
wanted; make a slip or half knot at one end and pass the
other end down through it to form a loop, then tie the ends
of yarn together. Hold this knot between thumb and forefinger
of one hand, say the right, with the yarn which pulls
through the knot under the same hand, and the loop which
was formed held on the forefinger; hold the yarn which does
not pull in the left hand, pass the forefinger of the left hand
through the loop on right forefinger from front to back,
catch up and pull through the non-pulling or left-hand
thread—exactly as you would make a chain-stitch in crochet—transfer
the knot (which ties the two ends together)
to the thumb and forefinger of left hand, keeping the loop
over forefinger, and draw up the pulling yarn. Now the
position of the loop, pulling yarn and knot is exactly the
same in the left hand as formerly in the right. Continue
by passing the forefinger of right hand through the loop,
catching up the non-pulling thread and drawing it through
to form the new loop (on right hand again), transfer the
knot and pull up. This is really a sort of double chain, and
when one has learned to make it evenly and well, it will be
found superior for bags, lingerie, and many other articles
requiring a drawstring or cord.
A Serviceable Sweater
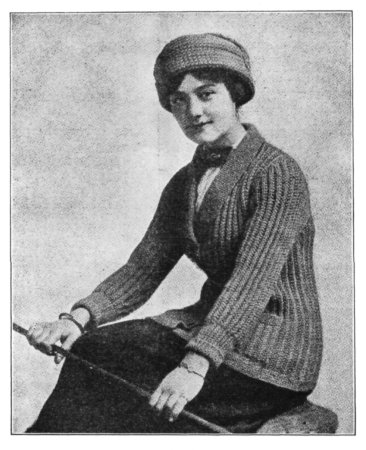
A Serviceable Sweater
Use fourfold Germantown zephyr and a pair of No. 5
needles, with one pair two sizes smaller. As the sizes
or numbers of needles vary, and also do methods of knitting,
it is a good plan to work a little block before beginning
the pattern. Cast on, say, 12 stitches, knit across and
purl back, repeating these two rows until you have a square.
There should be 5 stitches to the inch in width, and seven
rows should make an inch in length. If you get less, use
larger needles, say No. 6.
It is also a good plan to practise on the pattern a little, so
that you will become familiar with it and can narrow or
widen and still keep the ridge. Cast on any number of
stitches divisible by four, with one stitch over, knit 2, purl
2, until but one stitch remains, and knit that. All rows are
the same, the odd stitch breaking the rib and making a
ridge. When you come to the decreasing later you can tell
whether you are keeping the pattern correct, by watching
the knitted stitch, which forms a sort of chain right on top
of the ridge, and must be kept throughout.
Left front: Cast on 65 stitches on the larger needles
and knit 12 rows plain for the band at lower edge.
13. Knit 10 (these stitches are for the plain border up
the front), * purl 2, knit 2, repeat from *, knitting last
stitch.
14. Slip 1, purl 1, * knit 2, purl 2, repeat from *, knitting
last 10. Repeat these two rows until you have 110
rows in all.
111. Knit 2, narrow, knit 6; finish row in pattern.
112. In pattern until 9 stitches remain, knit these.
113. Knit 2, narrow, knit 5; continue in pattern.
114. In pattern, knitting last 8 stitches.
115. Knit 2, narrow, knit 4; continue in pattern.
116. Like 114th, knitting 7 at end.
117. Knit 2, narrow, knit 3; continue in pattern.
118. Like 114th, knitting last 6.
119. Knit 2, narrow, knit 2; continue in pattern.
120. Bind off 3, knit in pattern to within 5 stitches of
end, knit these.
121. Knit 2, narrow, knit 1; continue in pattern.
122. Like 120th row, knitting 4 at end.
123. Knit 2, narrow; continue in pattern.
124. Like 120th row, knitting 3 at end.
125, 127, 129. Like 123d row.
126, 128. Bind off 1, knit in pattern until 3 stitches remain,
knit these.
130. Knit in pattern until 3 stitches remain, knit these.
Continue to work until you have completed the 171st
row, doing the odd rows like the 123d and even rows like
130th, when you should have 23 stitches on the needle.
From this point work until you have completed the 183d
row, increasing at beginning of 172d, 176th and 180th rows
by knitting in the back, then in the front of the 2d stitch.
You should then have 20 stitches on the needle. Knit one
plain row (the 184th) and bind off.
Right front: Begin like left front, doing 12 plain rows.
13. Knit 10, * knit 2, purl 2, repeat from * to end, knitting
last stitch.
14. Knit 2, purl 2, repeat until 11 stitches remain, purl
1, knit 10. Repeat last two rows until you have 27 rows in
all.
28. Knit as usual until you have the 10 border stitches
remaining, knit 3, bind off 3, knit 4.
29. Knit 4, cast on 3, knit 3, and continue as usual.
This forms the buttonhole. Make five buttonholes at
equal distances apart, and begin the narrowing for collar in
the 11th row, continuing like left front.
Back: Cast on 79 stitches and knit 12 rows plain; then
work in the pattern until you have 120 rows in all, which
brings the work to the armhole.
121. Bind off 2 stitches and knit remainder as usual,
taking care to keep the pattern. Repeat this row seven
times, when you will have taken 8 stitches from each side.
Knit 48 rows in pattern
on the remaining
63 stitches.
177, 178. Knit in
pattern until within 7
stitches of the end;
turn, leaving these
stitches on left-hand
needle without
knitting.
179, 180. Knit in
pattern to within
13 stitches of the
end (including the 7
stitches previously
left), turn.
181, 182. Knit in
pattern to within 19
stitches of end, turn.
183. Knit 4, narrow,
(knit 5, narrow) twice,
knit rest plain, to end
of needle.
184. Knit plain
entirely across, and
bind off.
Sleeves. Cast on
97 stitches.
1. Knit 40, * purl
2, knit 2, repeat from
* 3 times, purl 1, turn.
2. Slip 1, knit 1, *
purl 2, knit 2, repeat
from * 4 times, knit
1, turn.
3. Slip 1, knit 1, *
purl 2, knit 2, repeat
from * 5 times, purl 2,
knit 1, turn.
4. Slip 1, purl 1, *
knit 2, purl 2, repeat
from * 7 times, knit
1, turn.
5. Slip 1, purl 1, * knit 2, purl 2, repeat from * 8 times,
knit 3, turn.
6. Slip 1, knit 1, * purl 2, knit 2, repeat from * 10 times,
knit 1, turn.
7. Slip 1, knit 1, * purl 2, knit 2, repeat from * 11
times, purl 2, knit 1, turn.
8. Slip 1, purl 1, * knit 2, purl 2, repeat from * 13 times,
knit 1, turn.
9. Slip 1, purl 1, * knit 2, purl 2, repeat from * 14 times,
knit 3, turn.
10. Slip 1, knit 1, * purl 2, knit 2, repeat from * 16
times, knit 1, turn.
11. Slip 1 knit 1, * purl 2, knit 2, repeat from * 17
times, purl 2, knit 1, turn.
12. Slip 1, purl 1, * knit 2, purl 2, repeat from * until
but 7 stitches remain, turn.
13. Like 12th row, leaving 4 stitches at end.
14. Slip 1, knit 1, * purl 2, knit 2, repeat to end, knitting
last stitch.
15. Slip 1, purl 1, * knit 2, purl 2, repeat to end, knitting
last stitch. Continue to knit in pattern, decreasing at
beginning and end of every 8th row until 73 stitches remain,
then knit without decreasing until you have 120 rows,
counting from the 15th row.
Take the smaller needles and commence the cuff on the
sleeve-stitches as follows: Slip 1, (narrow, knit 2) 3 times,
(narrow, knit 1) 14 times, narrow, knit 2, to end of row.
Repeat last 3 rows until you end with 2 stitches and bind off.
Pockets.—With the larger needles cast on 23 stitches.
1. Knit 1, * knit 2,
purl 2, repeat from *
across, ending with
knit 2.
2. Slip 1, * purl 2,
knit 2, repeat, ending
with purl 1, knit 1.
3. Slip 1, * knit 2,
purl 2, repeat, ending
with knit 2.
Repeat last two
rows until you have
32 rows in pattern,
then knit 10 rows
plain for top of pocket
and bind off.
To make up the
coat, first press the
border of fronts;
stretch into shape,
pin to an ironing-board,
cover with a
damp cloth and press
with a fairly hot iron
until the cloth is dry.
This will prevent the
coat from drawing up,
as the ribs are inclined
to do. For sewing,
use a blunt-pointed
needle to
avoid splitting the
wool. Sew up the
side and shoulder-seams,
taking a stitch
from each edge and
keeping the edges perfectly
even, being careful
not to draw the
sewing-yarn so tightly
as to pucker the seam
in the least. Sew
up the sleeves, and
place the sleeve-seam an inch to the front of the side-seam,
easing in any fulness there is around the top.
Place the center of collar at center of back before
sewing on; this must be done on right side of coat, and the
collar turned over. Sew on the pockets, matching the
ridges, and sew on five pearl or bone buttons, about three-fourths
of an inch in diameter, to correspond with the buttonholes,
placing a small pearl button at the back of the
larger one on wrong side of coat and sewing through both
together.
This coat measures twenty-six inches from shoulder to
hem. It may easily be made longer, if desired, but the
model is an excellent one for ordinary wear, and very
“natty,” and it has the merit of being quickly knitted.
As has been suggested, a good way to do, when knitting
a sweater in any stitch, is to have a pattern and work to
fit that. First, have a coat cut from any old cloth, and of
any style desired. Seam it up and try it on, having it fitted
nicely, then cut along the seam and take apart. Fasten
the different parts on a smooth surface by means of thumbtacks
and knit to measure, without stretching your work.
Ladies’ Sweater
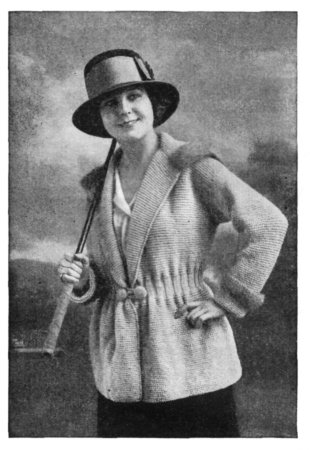
Ladies’ Sweater
This sweater requires five skeins of knitting-worsted,
and four balls of Angora; electric blue for the body of
the garment, and gray Angora were combined in the model,
but other colors may be chosen at pleasure. The work is
done in plain knitting, back and forth, with ribbed belt.
With the knitting-worsted and No. 5 needles, cast on 119
stitches for the back, which will measure about twenty-four
inches, and knit 48 ribs, or 96 rows. Next row, * narrow,
knit 4; repeat from *. Then change to No. 12 steel needles
and do 20 rows in triple rib (knit 3, purl 3) for the belt.
Change to No. 5 needles and knit 20 ribs; then decrease 1
stitch at end of needle every other row five times. Knit 29
ribs plain, or without decreasing. Next row, knit 34
stitches, slip them on to a spare needle, bind off 21 stitches
for neck, and on the remaining 34 stitches, knit 4 ribs; then
cast on 30 stitches at the neck, knit 29 ribs, increase 1
stitch at armhole every other row five times, and knit 22
ribs plain. Change to the steel needles, and work the belt
as directed for the back, (purl 3, knit 3,) starting from
front edge. Having completed the belt—20 rows of triple
rib—change to No. 5 needles; * knit 4, increase 1 stitch,
repeat from *. Then knit 48 ribs and bind off on the wrong
side. Knit the other front to correspond, omitting buttonholes
if these are used.
For the sleeve: Working on right side of sweater, pick
up 1 stitch on each rib around the armhole, 72 stitches in
all; knit 8 ribs, then decrease 1 stitch at each end of needle
every 8th rib, eight times. Change to steel needles and
knit 12 ribs for the wrist; change to the larger (No. 5) needles,
* knit 4, narrow; repeat across, then knit 12 ribs, join
the Angora, knit 7 ribs, and bind off.
Collar: Using No. 5 needles and the knitting-worsted,
cast on 65 stitches; knit 28 ribs. Join the Angora wool,
knit 11 rows, increasing 1 stitch at each end of needle every
other row, and bind off. Working on right side of collar
pick up 1 stitch on each rib at the side, knit 11 rows, increasing
1 stitch every other row toward the corner and
keeping the neck edge even, and bind off. Make the other
side of collar to correspond and sew up the mitered corners.
The border of Angora wool may be as much wider as one
chooses to make it by adding more rows or ribs.
Two large buttons covered with the knitting-worsted—either
knitted or crocheted—and furnished with a loop
sewed on each side, are used to fasten the belt.
For the buttons: Using a bone hook which will carry
the yarn, make a chain of 3 stitches, turn, and in 2d stitch
of chain make 8 doubles; in next round make 2 doubles in
each stitch, working in both veins so there will be no rib;
then make 1 double in 1st stitch, 2 in next, and repeat.
Continue to work around and around until you have a circle
which will cover the button-mold—5 rounds in all were required
for top of buttons used on model, work around without
widening, slip in the mold, then * miss 1, a double in
next, and repeat until the cover is closed. If preferred,
knit a tiny square as you did the body of the garment; and
use this to cover the mold, drawing it snugly over, and
fastening underneath. For the loop, make a chain of 30
stitches, turn and make a double in each stitch; fasten securely
beneath the button.
Ladies’ Knitted Gloves
with Fancy Backs
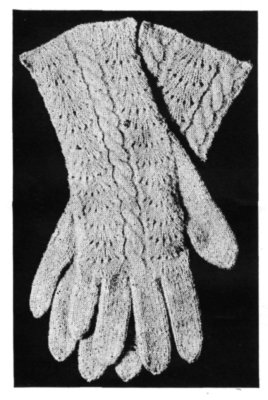
Ladies’ Knitted Gloves with Fancy Backs
Use No. 16 steel needles, with Spanish knitting-yarn or
worsted. Cast on 57 stitches.
1. Purl 2, slip and bind, (over, knit 1) 5 times, over,
narrow, purl 2, knit 6; repeat twice.
2. Purl 2, knit 13, purl 2, knit 6; repeat.
3. Purl 2, slip and bind, knit 9, narrow, purl 2, knit 6;
repeat.
4. Purl 2, slip and bind, knit 7, narrow, purl 2, knit 6;
repeat.
5. Same as 4th row.
6. Purl 2, slip and bind, (over, knit 1) 5 times, over,
narrow, purl 2, take 3 of the 6 stitches off on a separate
needle, hold this at back of work, knit next 3 stitches, then
knit the 3 on separate needle; repeat.
Continue in pattern, twisting the “cable” as directed
every 6th row, until the wrist is seven patterns in length.
Then carry one cable up back of hand, with an openwork
stripe each side, and knit plain across palm.
Commence thumb at top of wrist. As the gloves are
right and left, care must be taken in starting the thumb so
that both will not be for the same hand. On the left-hand
glove the thumb is started at right of the stripe, on the
right-hand glove at the left of stripe. Begin thumb with
widen, knit 1, widen; knit 3 rows as usual, then widen, knit
3, widen; continue in this way until you have widened the
thumb to 17 stitches. Put these on 2 needles, on a 3d needle
cast on 7 stitches, join and knit once around, in each of
next 3 rounds narrow 1 of the 7 stitches, arrange the
stitches evenly on 3 needles, knit two inches, then narrow
at end of each needle until you have 6 remaining, put these
on 2 needles and bind off.
Continuing with the hand, pick up the 7 stitches cast on
at base of thumb, knit to the base of the little finger, and
divide the stitches on 2 needles, or, if more convenient, take
them off on a twine. For the little finger: Take 8 stitches
from back needle and 8 from front, and cast on 6 stitches,
knit once around plain, narrow off 1 of the 6 stitches in each
of next 5 rounds, knit 2 inches, narrow 1 stitch at end of
each needle until 6 stitches remain, put these on 2 needles
and bind off.
First Finger: Pick up the 6 stitches cast on for little
finger, knit to the middle, take 8 stitches from each side
next the thumb, cast on 6 stitches for inside of finger, knit
once around plain, in next 4 rounds narrow off 1 of the 6
stitches, knit two and one-half inches, and finish off as
before.
Third Finger: Pick up the 6 stitches cast on for first
finger, knit them, knit plain, leaving 9 stitches toward little
finger, putting these on separate needle, 9 stitches from
other side, cast on 6 stitches, knit until you get to those left
for little finger, narrow 1 of these and 1 of the 6 each time
around for 6 rounds, knit two and one-half inches, and
finish off as directed.
Middle Finger: Pick up the 6 from last finger, knit
around plain, proceed as directed for third finger, knit two
and three-fourths inches plain and finish off.
Knitted Slippers with
Ermine Trimming
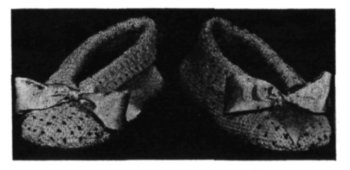
Knitted Bedroom-Slippers with Ermine Trimming
Materials required are three skeins fourfold Germantown
yarn, two colors, and one yard of ribbon. Pink
and white yarn, with a little black, and pink ribbon are
used for the slippers illustrated.
Cast on 15 stitches with white yarn, using medium-size
steel needles. Knit back and forth until you have a perfect
square of white, then join the color. The square is for the
toe of slipper.
Knit back and forth on the 15 stitches until you have a
strip long enough to extend around the sole of slipper and
join to the square on other side, leaving two sides and one
corner for the toe.
Darn the white with black; beginning at lower right-hand
corner, bring the needle through the first two ribs and
down between next two, miss three ribs, keeping the long
thread on the wrong side, and repeat, having every other
row alternate. This may be done before the strip is joined
to opposite side of square, if more convenient. Sew to the
sole, using strong thread and over-and-over stitches. The
strip should be stretched somewhat during the sewing, in
order to make the slipper cling well to the foot.
For the border: Cast on 10 stitches with white and knit
plain, back and forth, until the strip is long enough to go
around the top. Darn with the black yarn, making three
rows, over one rib and under three, alternating the stitches.
Sew to top of slipper, turn back, and put on the bows.
These slippers are very easily knitted, extremely pretty
and may be made to fit any size of sole. For a larger slipper
cast on an additional number of stitches for the square,
which will make the strip proportionally wider; knit it long
enough for the larger sole, and make the border wider, if
desired. A smaller slipper is begun with less stitches, following
the same general directions.
Babies’ Long Bootees
Babies’ Long Bootees
Two colors of Saxony, blue and white or pink and white,
and two steel knitting-needles, No. 14, are required
for these bootees.
With color, cast on 57 stitches.
1. Knit plain.
2. With white, knit 4, over, knit 3, * slip, narrow and
bind, knit 3, over, knit 1, over, knit 3; repeat from * to end
of row.
3. Purl.
Repeat last 2 rows three times; with color knit 2 rows;
with white repeat 2d and 3d rows twice, and again knit 2
rows plain with color and 2 rows plain with white.
With white knit 14 rows of single rib (knit 1, purl 1).
With color knit 2 rows plain; then with white knit 8 rows
in single rib; repeat the last 10 rows, and again knit 2 rows
plain, with color.
With white knit 1 row, purl 1 row, alternately, for 4 rows;
this gives the appearance of plain knitting on the right side.
Make a row of spaces in which to run ribbon, thus: Knit
2, * over 3 times, narrow, knit 1; repeat from * to end of
row. Purl back, dropping 2 of the “overs.”
Again knit forward and purl back for 5 rows; then knit
15 rows in single rib, completing the leg.
For the instep: Slip 1st 18 stitches on to the needle, join
in the color, knit 21 stitches, turn and knit back. With
white knit 1 row and purl 1 row, alternately, for 6 rows.
Repeat last 8 rows three times, which will give four white
stripes and the same of narrow ones, in color; again knit
forward and back with color.
For the slipper or foot, using color, knit off 18 stitches on
right-hand needle, pick up and knit 17 stitches along the
side of instep, knit 21 across instep, pick up 17 on other
side and knit the 18 stitches on left needle. Knit back and
forth plain for 20 rows and bind off. Sew up the foot and
back of leg, and draw ribbon through the spaces.
These bootees come up well to the knee, and are warm as
well as pretty. The ribbed portions cause them to fit snugly,
so they are not likely to slip down and off the little feet.
Child’s Knitted Mittens
Child’s Knitted Mittens
Use Saxony yarn with needles of suitable size, as you
knit tight or loose. No. 17 is a good average size.
Cast 18 stitches on each of three needles.
Knit 2, purl 1; repeat, until the wrist is of length desired,
say two inches.
For the pattern, knit as follows:
1. Purl.
2, 3, 4. Knit 2, purl 1.
These 4 rows are repeated throughout.
Begin to widen for the thumb in the 2d row above the
wrist; to widen pick up a stitch between needles and knit it,
knit 1, widen, and continue in pattern. Knit 2 rows, in
pattern, and again widen, knit 3, widen, across base of
thumb. Continue in this way, adding 2 stitches between
the widenings every 3d row, and keeping as closely as possible
to the pattern, until you have 21 stitches across the
thumb. Knit around twice in pattern and take the thumb-stitches
off on a strong thread.
Knit around in pattern, and when you come to the
thumb cast on 7 stitches, or one third the number widened
for the thumb. Continue knitting the hand to the tip of the
little finger, then commence narrowing. The manner in
which this is done depends on the shape of the hand to be
fitted. For an ordinary mitten, narrow every 5th stitch,
and knit 5 times around; then narrow every 4th stitch and
knit 4 times around; every 3d stitch and knit 3 times
around; every 2d stitch and knit twice around; then narrow,
knit 1, repeat around, knit once around, narrow every
stitch, draw yarn through, and darn the end neatly and
securely. It is an excellent plan to “run” the tip of a mitten
on the wrong side, as you do the heel of a stocking,
since it makes it wear longer, especially if intended for
rough usage. The narrowing of a child’s mitten may begin
with every 4th stitch. Also, if the hand is long and slender,
an additional row may be knitted between the widenings
for the thumb.
Take the stitches off the thread on 2 needles, and with
the 3d pick up and knit the stitches across the hand, which
were cast on. When knitting around the first time, narrow
once each end of the picked-up stitches.
Even the stitches on the needles, and knit around in pattern
until you reach the base of the nail, then narrow off,
beginning with once in 3 stitches. Draw through the last
stitches at tip and darn down.
Knee-Cap
Knee-Cap
Elderly people, or those at all inclined to rheumatic
twinges, appreciate the knee-cap, and a pair of them
will make a most acceptable gift to grandpa or grandma.
No. 12 steel needles and Germantown yarn were used for
the model, which may be made more or less heavy, as desired,
by choosing coarser or finer yarn.
Cast 35 stitches upon each of three needles and knit
around 30 times in single rib—that is, knit 1, purl 1, alternately.
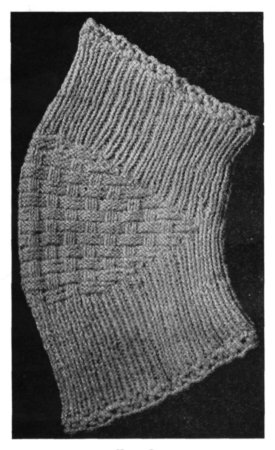
You are now ready to begin the gore, which may
be done in single rib, like the rest, or in basket-stitch (or
other fancy pattern) as in the model.
Take 26 stitches on one needle, leaving all other stitches
idle; take a stitch from each side every time across until but
42 stitches are left on both idle needles. Narrow at the end
of the busy needle each time until but 26 stitches are left
on the busy needle. Take up 23 stitches on the selvage at
each side, divide the stitches evenly on the three needles,
and you should have the original number of 35 stitches on
each of the needles. Again knit 30 rows in single rib, bind
off loosely, and finish with a simple crocheted border of
chain-loops or shells caught down in every other stitch.
To knit the gore in basket-stitch, * purl 6, knit 2; repeat
for 3 rows, then knit 1 row plain; repeat 1st 3 rows, placing
the 2 plain stitches exactly in the center of the 6 purled
stitches of previous rows. This change, made after each
plain row, gives the woven- or basket-effect, and the pattern
is a very pretty one for sweaters.
Wristers or Pulse-Warmers
Wristers or Pulse-Warmers
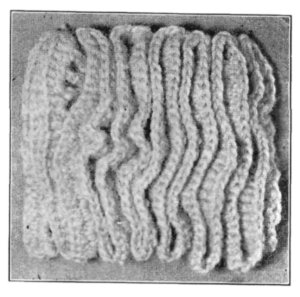
Wristers or pulse-warmers, are very comfortable on
a cold day, and those described particularly so, as
they fill the sleeve and completely exclude the wind. Using
knitting-worsted, or yarn of any desired size or quality
with needles to correspond, such as would be employed for
a man’s knitted sock, cast 18 to 22 stitches on each of 3
needles, and knit 2, purl 2, alternately, for 35 rows or more,
according to length required. Bind off loosely.
With bone crochet-hook work in straight rows from top
to bottom, putting a treble in every other stitch and 2
chain-stitches between trebles; after the last treble at the
edge chain 2, miss a row and return on the next.
Having completed the rows of spaces, make 2 trebles in
1st space, 3 in next, and repeat, working back and forth
until all the spaces are filled. A very attractive finish is to
work a row of doubles in color, making a double in each
treble. With fine wool, crochet-silk may be prettily used
for this finish.
A fringed wrister may be made on the foundation described
by holding a pencil on lengthwise with the left hand,
and with the right sewing over and over it; make the rows
quite close together, cut the wound yarn open with a pair
of sharp scissors, and brush lightly across it, back and forth,
until the cut ends become “mossy” or fluffed up.
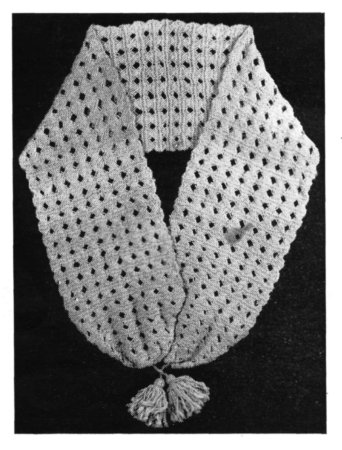
Motor-Scarf
Motor-Scarf
This motor-scarf may be of pink and white, or any preferred
colors of Shetland floss. Use wooden needles
and cast on 100 stitches with pink.
1, 3. Purl.
2. Knit plain.
4. Knit 3, over twice, narrow; repeat across, ending
with knit 3.
5. Purl, dropping 2d of the over-twice loops.
6. Knit plain.
7, 9. With white, purl.
8, 10. Knit plain.
Repeat until the scarf is of the length required. The
sides are finished with shells, in white, making 8 trebles,
well drawn out, in the center of the pink stripe, and fastening
in center of white stripe with 1 double.
Finish the ends with fringe knotted in, six inches long and
composed of 10 threads each of pink and white.
Sport Scarf
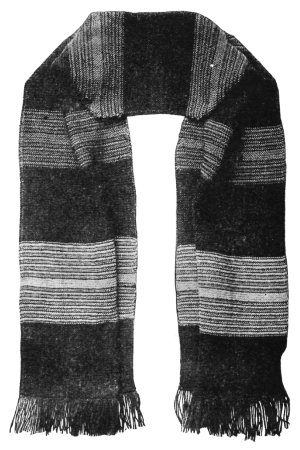
Sport Scarf
A very attractive scarf uses brown Shetland as a
body color, with deep cream-color, green and rose in
combination with the brown for stripes. Using No.
3½ or No. 4 bone needles, cast on 84 stitches and knit back
and forth for 64 rows or 32 ribs; then join in the cream-color
and knit (4 rows of cream, 2 rows of brown) 5 times, 10
rows of cream, (2 of brown, 4 of cream) 5 times; 64 rows of
brown; join in green, (4 rows of green, 2 of brown) 3 times;
10 rows of green; (2 of brown, 4 of green) 3 times; 64 rows of
brown; (4 of rose, 2 of brown) 3 times; 10 of rose; (2 of
brown, 4 of rose) 3 times; * 64 rows of brown. Reverse
from *, making the other end of scarf as directed for
first half.
For the fringe, cut strands of brown six inches long, and
knot a strand in each stitch.
For a lighter scarf use No. 4 bone needles and cast on
48 or 50 stitches. The larger needles with loose knitting
will give work much more open. If desired one may introduce
rows of fancy knitting instead of the colored stripes.
In fact, having made one scarf, the worker will find it possible
to vary it in many ways, and will find such variation a
pleasing study.
Many like to use a thread of silk or mercerized crochet-cotton
with the Shetland floss or other wool which may be
chosen.
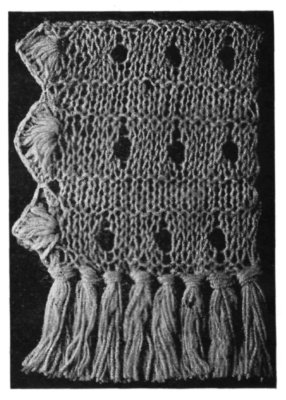
Scarf in Lattice-Stitch
Scarf in Lattice-Stitch
Using Shetland floss and No. 4 bone needles, cast on as
many stitches as required for width of scarf, using a
multiple of 6 with 2 over.
Knit back and forth 6 times.
7. Knit 1, over 3 times; repeat, knitting last stitch.
8. Knit 1, draw up the loop about one inch in length,
(drop the “overs,” and slip the knitted stitch) 6 times, slip
the 6 long stitches to left-hand needle, draw the last 3 over
1st 3, knitting each, then knit the 1st 3, and repeat, knitting
1 at end of row. Take care the long stitches are not
twisted.
9. 10, 11. Knit plain.
Repeat from 7th row.
Gather up the ends of the scarf and finish with cord and
tassel, or a bow of ribbon, as preferred.
Knitting for the Red Cross
(Official Red Cross Photographs)
Sleeveless Sweater
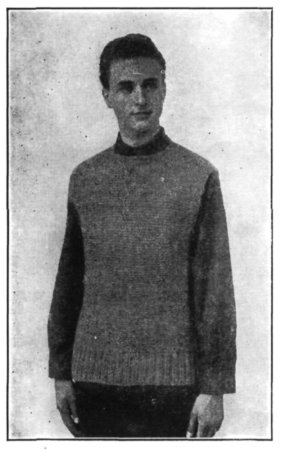
Three hanks of gray or khaki knitting-yarn (¾ pound),
fivefold, and a pair of amber needles No. 5, or No. 3
Red Cross needles will be needed; 11 stitches should measure
two inches. Cast on 80 stitches. Knit 2, purl 2 stitches
for 4 inches. Knit plain until sweater measures 25 inches.
Knit 28 stitches, bind off 24 stitches for neck, loose. Knit
28 stitches. Knit 7 ridges on each shoulder, cast on 24
stitches. Knit plain for 21 inches. Purl 2, knit 2 stitches
for 4 inches. Sew up sides, leaving 9 inches for armholes.
Two rows single crochet around neck and 1 row single crochet
around armholes.
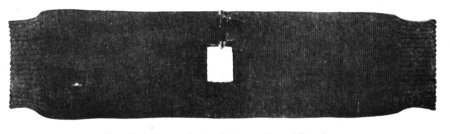
Sleeveless Sweater before Sides Are Sewed Together
Washcloth
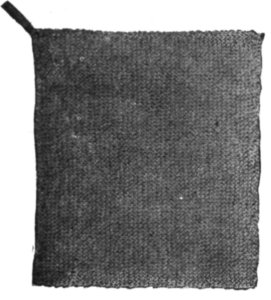
White knitting-cotton (medium weight); 1 pair Red
Cross needles No. 1.
Cast on 70 stitches, knit back and forth plain until cloth
is about 10 inches square, and bind off. Sew a loop of tape
to one corner.
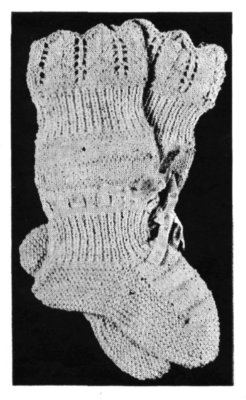
Service Sock
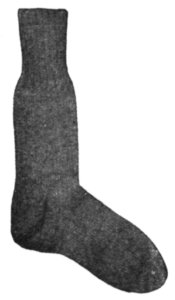
Service Sock
A service-sock requires three skeins of knitting-yarn
for two pairs, with No. 11 steel needles. Cast on 24 stitches
on each of 2 needles, and 20 on the 3d. Knit 2 and purl 2 for 3½
inches.
Knit 10, or halfway across the 3d needle, pick up an extra
stitch and purl it, keeping this always for the seam-stitch at
back of leg, knit plain to end of round. Continue knitting plain
and purling the seam stitch for four inches.
Knit to within 3 stitches of the seam-stitch, narrow, knit 1,
purl the seam-stitch, knit 1, slip 1, knit 1, draw the slipped
stitch over, and knit plain to end of round. Repeat, narrowing
as directed every 6th round, 4 times. Now knit without decreasing
for one inch.
For the heel: Place 15 stitches each side of the middle or seam-stitch,
and knit back and forth, 1 row plain and 1 purl, alternately,
for 25 rows, always slipping the 1st stitch. To turn the
heel, slip the 1st stitch, knit 15, narrow, knit 1, turn work; slip 1,
purl 2, purl 2 together, purl 1, turn, slip 1, knit 3, narrow, knit 1,
turn; slip 1, purl 4, purl 2 together, purl 1, turn; slip 1, knit 5,
narrow, knit 1, turn; slip 1, purl 6, purl 2 together,
purl 1, turn; slip 1, knit 7, narrow, knit 1, turn; slip
1, purl 8, purl 2 together, purl 1, turn; slip 1, knit
9, narrow, knit 1, turn; slip 1, purl 10, purl 2 together,
purl 1, turn; slip 1, knit 11, narrow, knit
1, turn; slip 1, purl 12, purl 2 together, purl 1,
turn; slip 1, knit 13, narrow, knit 1, turn; slip 1,
purl 14, purl 2 together, purl 1, turn; slip 1, knit
14, narrow. Proceed to pick up 17 stitches down
side of heel next to needle just finished, knitting
each as you pick it up; knit the 30 left on the
needle for front of foot, and pick up 17 down
other side of heel; then knit on with these half
the stitches left at top of heel.
Knit 1 round plain; narrow the
2d round as follows: On 1st side
needle knit to within 3 of end,
narrow, knit 1; knit across front
needle; on side needle knit 1,
slip 1, knit 1, pass slipped stitch
over, and knit to end. Decrease
in this manner every 2d round
until there are 15 stitches on each
side needle, reducing them to correspond
with the front needle, and
making 10 narrowings for the
instep.
Knit five inches without narrowing, then decrease for the toe
in the following manner: Knit to within 3 of end of 1st side needle,
narrow, knit 1; on front needle, knit 1, slip and bind as before, knit
to within 3 of the end, narrow, knit 1; on other side needle, knit 1,
slip and bind, knit plain to the end. Knit 2 rounds plain, and repeat
last 3 rounds three times more; then decrease with 1 row plain between
three times, and after that decrease every row until there
are but 4 stitches on the front needle. Finish off neatly, drawing
the toe together and darning in with a worsted-needle.
One-Piece Helmet
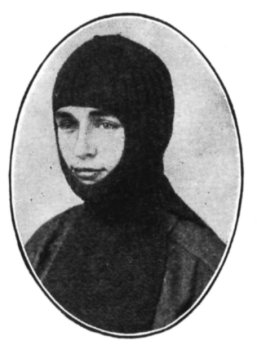
One-Piece Helmet
One hank of yarn (¼ pound); Red Cross needles No. 2.
Cast on 56 stitches loosely. Knit plain for 8 inches for
front piece, and leave on extra needle. Knit another piece
to correspond for back. These pieces must be at least 9
inches wide. Slip the stitches of both pieces on to 3 needles,
arranging for last 2 stitches of back piece to be on beginning
of 1st needle, with 38 stitches of front piece added
(making 40 on 1st needle).
Divide rest of stitches on other 2 needles; 36—36.
Beginning with 1st needle, knit 2, purl 2 for 6 inches.
Then on 1st needle knit 2, purl 2 for 18 stitches. Bind off 22
stitches for face opening. (Try to keep same arrangement
of stitches on needles for further directions.) Knit 2, purl 2
forward and back on remaining 90 stitches for 1½ inches,
always slipping first stitch. Cast on 22 stitches loosely
to complete face opening, and knit 2, purl 2 for 2½ inches
(adjust stitches by slipping 2 from end of 3d needle to 1st
needle, making 42 on 1st needle).
Knit 1 round plain. Knit 2 stitches together, knit 11, knit
2 stitches together, knit 1. Repeat to end of round. Knit 4
rows plain. Then knit 2 stitches together, knit 9, knit 2
together, knit 1. Repeat to end of round. Knit 4 rows
plain. Continue in this
way, narrowing on every
fifth round and reducing
number of stitches
between narrowed stitches
by 2 (as 7, 5, 3, etc.)
until you have 28
stitches left on needles.
Divide on 2 needles,
having 14 on 1st needle
and 14 on the other.
Break off yarn, leaving
12-inch end. Thread
into worsted-needle and
proceed to weave the
front and back together
as follows:
* Pass worsted-needle
through 1st stitch
of front knitting-needle
as if knitting, and slip
stitch off—pass through
2d stitch as if purling—leave stitch on, pass thread through
1st stitch of back needle as if purling, slip stitch off, pass
thread through 2d stitch of back needle as if knitting,
leave stitch on. Repeat from * until all the stitches are
off the needle.
Muffler

Muffler
Two and one-half skeins of knitting-yarn and one pair
amber needles No. 5, or Red Cross needles No. 3 will
be required. Cast on 50 stitches, measuring 11 inches, and
knit back and forth until the muffler is sixty-eight inches
in length.
Hot-Water-Bottle Cover
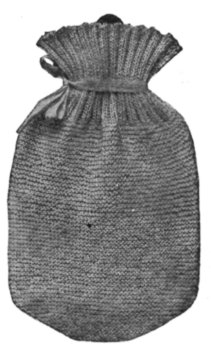
Hot-Water-Bottle Cover
White knitting-cotton (medium weight); 1 pair Red
Cross needles No. 1.
Cast on 56 stitches, knit 2, purl 2 and repeat until the
work is 4 inches deep. Then knit back and forth plain for
9½ inches more, or until entire work measures 13½ inches.
Next decrease 2 stitches at beginning and 2 stitches at end
of each needle until there are sixteen stitches left, and bind
off. Make another piece in same manner and sew together.
Attach a 20-inch piece of tape to seam at one side of ribbing
to tie around neck of bottle.
Helmet Made in Two Parts
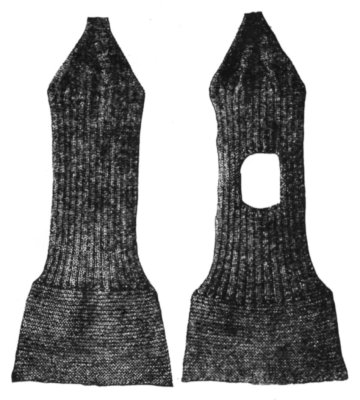
Helmet Made in Two Parts
One hank of yarn (¼
pound); 1 pair Red
Cross Needles No. 2.
The helmet is made in
two parts, which afterward
are sewed together.
Front of Helmet.—Cast
on 48 stitches (11
inches), knit plain for 25
ribs (6 inches) and knit 2,
purl 2 for 35 rows. On the
next row the opening for
the face is made as follows:
Knit 2, purl 2, knit 2, purl
2, knit 2, knit and bind off
loosely the next 28 stitches
and purl 1, knit 2, purl 2,
knit 2, purl 2. Run the
stitches before the opening
on a spare needle and
on the stitches at the other
side of opening knit 2, purl
2 for 12 rows. The last
row will end at the opening,
and at that point cast
on 28 stitches to offset those
bound off. Begin at the
face opening of stitches on
spare needle and knit 2,
purl 2 for 12 rows. At the
end of the 12th row continue
all across to the end
of other needle, when
there should be 48 stitches
on needle as at first.
Knit 2, purl 2 for 24 rows.
Top of Helmet.—Knit
2, narrow (knitting 2
stitches together), knit 14,
narrow, knit 14, narrow,
knit 12. Purl the entire
next row. On the 3d row
knit 2, narrow, knit 13,
narrow, knit 13, narrow,
knit 11. Purl 4th row. On
the 5th row knit 2, narrow,
knit 12, narrow, knit 12,
narrow, knit 10. Purl 6th
row. Continue to narrow
in the 3 places every plain
knitted row with 1 stitch
less between narrowings
until 9 stitches are left.
Back of Helmet.—Work
in same manner as for
front but omit the face
opening. Sew the stitches
of upper edges together
with joining-stitch. Sew
up the side seams, leaving
the plain knitting at shoulders
open.
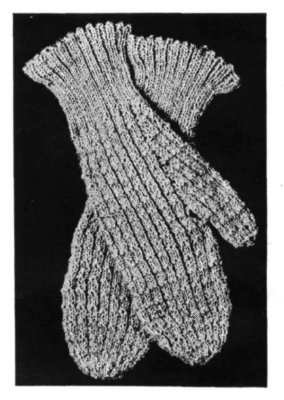
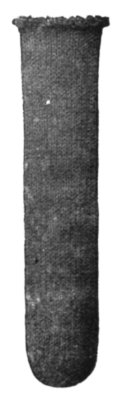
Thumbless Mitt or Wristlet
Thumbless Mitt or Wristlet
The thumbless mitt or wristlet
requires one half hank of
knitting-yarn, gray, with No. 2
Red Cross needles or No. 11 or
No. 12 steel needles. Nine stitches
measure one inch. Cast on 48
stitches and knit 2, purl 2, for
12 inches; bind off and sew up,
leaving an opening for the thumb
two inches in length, three inches
from one end. The ordinary
wristlets or pulse-warmers are
knitted in the same way, 8½
inches long, and sewed up with
no thumb-opening.
Wristlets made in one piece require
one half hank of yarn,
and 4 bone needles No. 3, or
steel needles No. 12. Cast on
52 stitches on 3 needles; 16-16-20.
Knit 2, purl 2, for 8
inches. To make opening for
thumb, knit 2, purl 2 to end
of “Third” needle, turn; knit
and purl back to end of “First”
needle, always slipping first
stitch, turn. Continue knitting
back and forth for 2 inches.
From this point continue as
at first for 4 inches for the hand.
Bind off loosely; buttonhole
thumb-opening.
Bed-Sock
Bed-sock
One hank of yarn
(¼ pound) is
required, with Red
Cross needles No.
2 or steel needles
No. 11 or 12.
Cast 48 stitches
on three needles,
16 on each. Knit
plain and loosely
for 20 inches.
Decrease every
other stitch by
knitting two
stitches together
until you have
12 stitches on
each of two needles
opposite each
other. Break off
yarn and weave
stitches together
as per directions
for finishing one-piece
helmet.
Child’s Drawers-Leggings,
Knitted
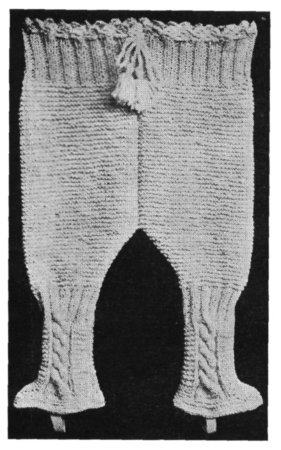
Child’s Drawers-Leggings, Knitted
Materials required are six hanks of Germantown
wool, a pair of bone needles No. 4, and a pair of steel
needles, No. 15.
Cast on 68 stitches.
1 to 16. Knit 2, purl 2; repeat. This is the double rib.
17. Knit 6 plain, turn; knit back on these 6 stitches,
turn.
18. Knit 12, turn; knit back on these 12 stitches.
Continue working in this way, knitting 6 more stitches
forward each row and knitting back on the same, until you
have 36 stitches on the needle. Knit back on these 36
stitches, turn. This brings 6 ridges at one side of the work.
Now knit plain across the entire 68 stitches.
Continue knitting back and forth until you have 34
ridges (not counting the 6 ridges at one side of work); in
next row narrow once at each end of row, and continue in
this way, narrowing a stitch each end, until you have 50
stitches remaining on the needle.
Do 12 rows of double rib (knit 2, purl 2), then begin the
cable-twist of ankle, thus:
1. Knit 7, purl 2, slip 3 stitches on a spare needle, knit
6, then knit the 3 stitches from the spare needle, forming the
twist, purl 2, knit 10, purl 2, slip 3 stitches on spare needle,
knit 6, knit the 3 stitches from spare needle, purl 2, knit 7,
turn.
2. Knit 6, purl 1, knit 2, purl 9, knit 2, purl 1, knit 8,
purl 1, knit 2, purl 9, knit 2, purl 1, knit 6, turn.
3. Knit 7, purl 2, knit 9, purl 2, knit 10, purl 2, knit 9,
purl 2, knit 7.
Repeat last 2 rows, alternately, for 30 rows, making the
twist, as directed in 1st row, every 6th row.
For the instep: Count off or leave 29 stitches; knit back
8 stitches on these 29, and on the 8 stitches work back and
forth until you have 8 ridges. Pick up the stitches around
edge of instep, and work back and forth along the entire
row for 4 ridges; bind off.
Make the other leg in the same way, sew up the seams
and join the two by the middle seam.
Around the top work a row of spaces, in which to run the
drawstrings, thus:
1. Fasten in, chain 5, * miss 2, a treble in next, chain 2;
repeat around, and join to 3d of 5 chain.
2. Miss 1 space, 4 trebles in next, miss 1 space, fasten
in next; repeat.
Crochet a cord of the wool and finish the ends with
tassels.
A Knitted Hood for
Miss Dolly
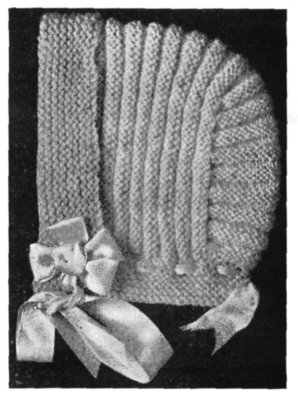
A Knitted Hood for Miss Dolly
Using blue Saxony and medium steel needles, cast on 74
stitches; knit plain back and forth until you have 10
single ribs, then bind off 6, knit across to within 6 stitches
of the end and bind off these. This is for the front or turnover
of the hood.
Next row, knit 1, * over, narrow, knit 1; repeat, forming
holes in which to run ribbon.
Now change to white yarn and knit across, adding 6
extra stitches distributed along the front near the top in
order to make the back a trifle full, * knit 1 row, purl 1 row
and knit 1 row for a triple rib; repeat from * 16 times, always
slipping the 1st stitch of each row to give a good
selvage.
Bind off 26 stitches on each end of the work; be sure
that this is done on the wrong side, and just before knitting
the last row of last rib, as the binding off finishes the
rib and is essential in keeping all the ribs the same.
Knit the crown on the 16 middle stitches, in the triple
ribs described. Widen twice each end of crown needle
during 1st 2 ribs. Knit same number of ribs as the front,
narrowing once or twice each end of needle near extreme
end of crown.
Pick up the stitches for the neck around lower part of
crown and fronts, about 18 stitches on each of the latter
and alternate loops on the crown; knit across with blue,
making a row of holes as on the front; knit 6 or 7 single ribs,
and sew neatly to the stitches bound off at lower edge of
front.
Sew the crown neatly to front, run ribbon in the spaces
made for it and tighten slightly, and finish with ties and
bows of ribbon.
By adding extra stitches to the front, and making the
crown proportionately larger, these directions will be
found to serve admirably for baby’s first hood, or as large a
hood as wanted.
A Lesson in Crochet
The stitches and terms given herewith are
such as are in general use, and were
taught the writer by an English teacher of
crocheting, herself a professional in the art.
In some periodicals and books, the real slip-stitch
is omitted, and the single is called
slip-stitch; the double is called single, the
treble is called double, the double treble is
called treble, and so on.
There are different ways of holding the
crochet-needle and carrying the thread, and
many consider one way as good as another
unless, as is usually the case, one’s own
method is thought a little the best. The
following instructions were given by the
English teacher in question, and are those
commonly accepted: Hold the needle in the
right hand very much as you hold a pen when
writing, letting the handle extend between
the forefinger and thumb, which rest on and
hold the needle. Hold nothing but the
latter in the right hand, not allowing the
fingers of that hand to so much as rest on
the work. Hold work with thumb and second
finger of left hand, letting the thread pass
over the forefinger, slightly raised, or held up
from the work, under the second, over the
third and under the little finger. These
instructions are especially good for using
yarns, when it is desirable to keep the work
as soft and fluffy as possible.
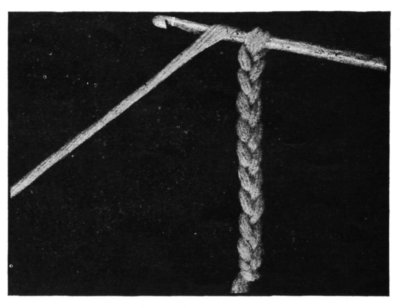
The chain. (Figure 1.) Make a loop of
thread around the needle, take up the
thread and draw through this loop (that
is, push the hook under the thread that
passes over the forefinger, draw it back,
catching the thread, and pull this through
the loop on the needle), forming a new
stitch or loop, take up the thread and draw
through this, and so continue until the
chain is of the length required, tightening
each loop as drawn through, so that all
will be of uniform size and smoothness.
After a little practise one does this without
thought. When abbreviations are
used, that for chain is ch.
The slip-stitch is properly a close joining
stitch: Drop the stitch on the needle,
insert hook through the stitch of work to
which you wish to join, take up the
dropped stitch and pull through, thus
making a close fastening. This stitch is
sometimes used to “slip” along certain
portions of the work, from one to another
point, but single crochet is more often employed
for this. The abbreviation is sl-st.

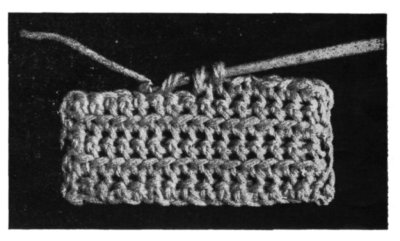
Single crochet (Figure 2, frequently
called slip-stitch, and sometimes mitten-stitch)
is made thus: Having a stitch on
needle, insert hook in work, take up the
thread and draw it through the work and
the stitch on the needle at the same time.
The abbreviation is s c.
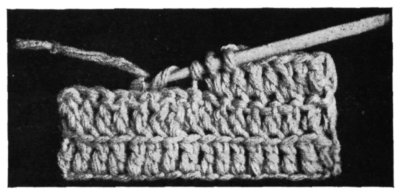
Double crochet. (Figure 3). Having
a stitch on needle, insert hook in work,
take up thread and draw through, giving you
two stitches on the needle; take up thread
and draw through the two stitches. The
abbreviation is d c. There are many
variations of the double-crochet stitch;
the slipper-stitch, or ribbed stitch, is
formed by taking up the back horizontal
loop or vein of each stitch in preceding row.
A quite different effect is given when the
hook is inserted under both loops.
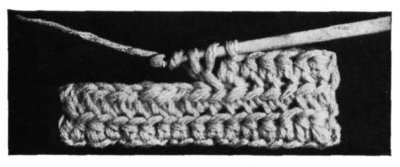
Treble crochet. (Figure 4.) Having a
stitch on the needle, take up the thread as
if to make a stitch, insert hook in work,
take up thread and draw through, making
three stitches or loops on the needle; *
take up thread and draw through two,
again and draw through two. The abbreviation
of treble crochet, is t c. It will be
noted that the single crochet has one
“draw,” the double two, and the treble three,
from which these stitches take their names.
Half-treble or short-treble crochet.
Like treble to *; then take up thread and
draw through all three stitches at once.

Double-treble crochet. (Figure 6.)
Having a stitch on the needle, take up
the thread twice, or put it twice over
the needle, insert hook in work, take up
thread and draw through, making four
stitches to be worked off; (take up thread
and draw through two) three times. The
abbreviation of double-treble crochet is d t c.
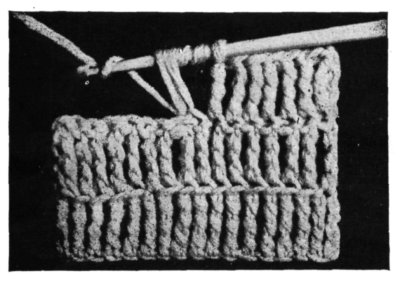
Triple-treble crochet. (Figure 7.)
Take up thread three times, insert hook
in work, take up thread and draw
through, making five stitches on needle;
work these off two at a time, as in
double treble. The abbreviation is t t c.
One sometimes has occasion to use other
extra-long stitches, such as quadruple
crochet (over four times before insertion
of hook in work), quintuple crochet (over
five times), and so on, which are worked
off two at a time, exactly as in treble or
double treble. In turning, one chain-stitch
corresponds to a double, two chain-stitches
to a half or short treble, three chain to
a treble, four to a double treble, five to
a triple treble, and so on, adding one chain
for each extra “draw.”
Parentheses ( ) and asterisks or stars
* * are used to prevent the necessity of
repetition and save space. They indicate
repeats of like directions. Thus: (Chain
3, miss 3, 1 treble in next) three times
is equivalent to chain 3, miss 3, 1 treble
in next, chain 3, miss 3, 1 treble in next,
chain 3, miss 3, 1 treble in next; or to *
chain 3, miss 3, 1 treble in next, repeat
from * twice.
The worker should be careful in the
selection of a hook. It should be well
made and smooth, and of a size to
carry the wool smoothly, without catching
in and roughening it. If too
large, on the other hand, the work is
apt to be sleazy. Needles that have
been used for some time work more
easily than new ones. If all makes of
crochet-needles were numbered in the
same way the size might be easily
designated; but it happens that no
two manufacturers use like numbers
for the same sizes, hence the rule given
is the best that can be.
Crocheted Jacket
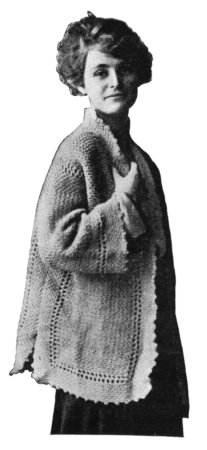
Crochet Jacket
One color or two may be used for making this pretty
jacket, which is extremely modish, and very comfortable
for the cool days and evenings sure to be experienced
during summer outings. Six skeins of fourfold Germantown
will be sufficient; or four skeins of one color for
the body and two of white for the border, if made in two
colors.
Make a chain of 54 stitches, turn.
1. Miss 3, a double in next, * chain 1, miss 1, 1 double
in next; repeat from * across, making 26 doubles; turn.
2. Chain 2, a double under 1 chain, * chain 1, a double
under next 1 chain; repeat across, turn.
Repeat 2d row until you have completed a strip 22 inches
long, for the back, bringing the
work to the shoulder.
Now work back and forth for
one shoulder and front, repeating
2d row until you have made 9
doubles; turn, chain 2, and repeat
until you have made 4 rows.
In the next row widen by making
2 doubles, 1 chain between,
in center of row, finishing row as
usual; widen in the center of
every 8th row until you have 15
doubles in the row, then continue
without widening until the
front is of the same length as
the back.
Leave 8 doubles for back of
neck and on the remaining 9
doubles work the other front to
correspond.
For the border: Commence
(with the border-color, if two
colors are used) at corner of
left front, make a treble under
1 chain (chain 3 for 1st treble),
* chain 1, a treble under next 1
chain; repeat from * all around,
putting 2 trebles with 1 chain
between in same stitch at
corners, and on the shoulders
at the neck to shape the collar.
Make another row in the same
way, then work in seed-stitch as
you did the body of the jacket
(a double under 1 chain, chain
1) for 8 rows, widening the
same stitches at corners each
time.
Fold the garment at the
shoulders, bringing fronts and
back together. Commencing
in 10th chain from bottom of
front and back, work in the
usual way for 25 stitches, a
double under each chain. Work
from underarm around the
armscye until the sleeve is 12
inches in length, or as long as
desired, then make the 2 rows
of spaces, in treble crochet, as before and finish with 7
rows of seed-stitch, same as body of jacket.
For the picot edge: Two doubles in 2 stitches, chain 3
for a picot; repeat.
The stitch given is very simple and pretty, but any other
fancy stitch may be used that is liked. Among others may
be named Lancaster-stitch, made as follows: Having a
chain of an even number of stitches, turn.
1. Miss 1st stitch, a double in each remaining stitch,
turn.
2. Chain 3, wool over, draw a loop through 1st stitch,
over, draw a loop through next stitch, over, draw a loop
through same stitch, over, draw a loop through next stitch,
over, draw through all the loops on needle, * chain 4, a
double in 1st stitch of the chain just made, which closes or
joins the cluster of loops, over, draw a loop through same
stitch with last loop of preceding cluster, over, draw a loop
through next stitch, over, draw a loop through same stitch,
over, draw a loop through next stitch, over, draw through
all the loops on needle, and
repeat from *; turn.
3. A double in 1st space,
double around the thread between
4 chain and cluster; repeat,
ending with a double in
top of 3 chain with which last
row started. Repeat 2d and
3d rows for the pattern.
The bird’s-eye-stitch is
simple and pleasing: Having
a chain of desired length, turn.
1. Miss 1, a double in each
stitch of chain, turn.
2. A double in double, taking
front loop of stitch in last row,
a double in next double, taking
back loop; repeat to end, and
repeat 2d row.
Still another pretty stitch,
easily adjusted to any garment,
is as follows: Chain a
number of stitches divisible by
3, turn.
1. Miss 1, a double in each
remaining stitch of chain, turn.
2. Chain 1, a double in each
double of last row, turn.
3. Chain 1, a double in
each of 2 doubles, * wool
over, insert hook in 3d stitch
of 1st row, take up wool and
draw through, (over, draw
through 2 stitches) twice,
miss 1, a double in each of
next 2 doubles; repeat from
* to end of row, turn.
4. Same as 2d row.
5. Chain 1, a double in
each of 1st 2 doubles, * wool
over and make a treble as
before, inserting the hook
under the treble of 3d row,
miss 1, a double in each of 2
stitches; repeat from * to end,
turn. Repeat 4th and 5th rows.
And another still: Make a chain of length required, turn.
1. Miss 3, a treble in next stitch, * miss 1, 2 trebles in
next stitch, repeat to end of row, turn.
2. Chain 3, 2 trebles between each group of 2 trebles in
last row; repeat. Repeat 2d row.
Tam-o’-Shanter
in Double Crochet
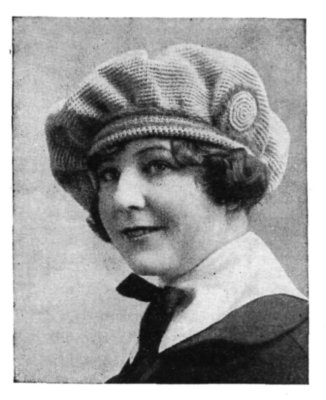
Tam-o’-Shanter in Double Crochet
For the model were used one skein of electric-blue knitting-worsted
and a ball of gray Angora wool, with a
hook large enough to carry the yarn easily.
Make a chain of 3 stitches, join.
1. Seven doubles in ring.
2. Two doubles in each double, taking both veins of
stitch.
3. A double in double, 2 in next; repeat.
4. A double in each of 2 doubles, 2 in next; repeat.
5. A double in each of 3 doubles, 2 in next; repeat.
Continue in this way, adding 1 double between widenings
each row, until you have 30 doubles in each section—between
widenings—or more, if a larger crown is desired.
33. A double in each of 7 doubles, miss 1; repeat.
34. A double in each of 6 doubles, miss 1; repeat.
35. A double in each of 2 doubles, miss 1; repeat.
36 to 45. A double in each stitch.
46, 47. With gray Angora wool, make a double in each
stitch and fasten off the last row neatly.
Cover a large, flat button-mold with the blue wool:
Make a chain of 3 stitches, turn, and in 2d stitch of chain
make 8 doubles; make 2 doubles in each of 8 doubles, working
in both veins of stitch; then make 1 double in 1st stitch,
2 in next, and repeat. Continue to work around and
around, widening to keep the work flat, until you have a
circle which will cover the button-mold, say 6 rounds; then
work once around without widening, slip in the mold, *
miss 1, a double in next, and repeat until the cover is closed.
For the edge of the button and the cord around top of
band either the double chain may be made, an ordinary
chain filled with double crochet, or—better still—the cord
may be knotted by what is called the “fool’s delight”
method—which seems a very sensible method, indeed:
Take a length of the Angora wool six times as long as the
cord is wanted to be; indeed, it will be better to start with
a longer piece, for fear it may “take up” more rapidly than
anticipated. Make a slip or half knot at one end of the
yarn, pass the other end down through this to form a loop,
then tie the ends of the yarn together. Hold this knot between
thumb and forefinger of one hand (say the right),
with the yarn which pulls through the half knot under the
same hand, and the loop which was formed held on the
forefinger, holding the yarn which does not pull in the left
hand; pass the forefinger of left hand through the loop on
right forefinger from front to back, catch up and draw
through the non-pulling or left-hand thread—exactly as
you would make a chain-stitch in crochet—transfer the
knot which ties the two ends together to thumb and forefinger
of left hand, keeping the loop over forefinger, and
draw up the pulling yarn, or that passed originally through
the half knot. Now the position of the loop, pulling yarn
and knot is exactly the same in the left hand as formerly in
the right. Continue by passing forefinger of right hand
through the loop on left forefinger, catching up the non-pulling
thread and drawing it through to form the new
loop (on right forefinger again), transfer the knot from left
hand to right, and pull up, repeating the process from beginning.
This is really a sort of double chain, and when
one has learned to make it evenly and well—as may be
done with a little practise—it will be found superior for
bags, lingerie, and many other articles requiring a drawstring
or a cord.
Sew this cord evenly around button and top of band,
and the cap is completed.
Ladies’ Sleeveless Jacket
or Hug-Me-Tight
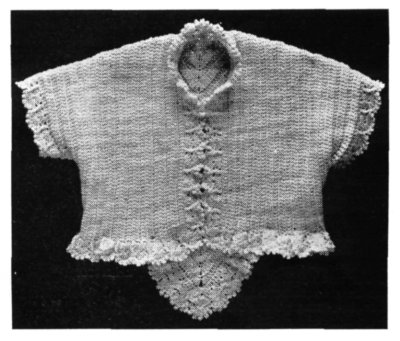
Ladies’ Sleeveless Jacket or Hug-Me-Tight
Use Germantown worsted, white or any desired color,
with a hook large enough to carry the yarn smoothly.
Commence with a chain of 140 stitches, turn.
1. Miss 3, 1 treble in each of 68 stitches following, shell
of 3 trebles, 2 chain and 3 trebles in next stitch, to widen
for center of back, a treble in each remaining stitch, turn.
2. Chain 3 for 1st treble, a treble in each treble, including
the 3 trebles of shell, up to the 2 chain, make a
shell as before under 2 chain, then a treble in each following
to the end, turn. Work always in back vein of stitch to
produce the ribbed or striped effect.
3 to 23. Same as 2d row. The jacket is now ready for
joining.
Commencing at the point in center of back, count 26
stitches, then fold over and, starting from the other end of
the same row, crochet the two sides together for 25 stitches,
taking a stitch from each side. This will leave about 65
stitches for armscye.
For the border:
1. Shell of 6 trebles in a stitch, miss 2, a treble in next,
miss 2; repeat. Commence with 3 chain for 1st treble of
1st shell, and join to that.
2. Shell of 6 trebles between 3d and 4th trebles of shell
in previous row, and treble in treble; repeat.
3. Chain 4, fasten back in 1st stitch for a picot, a double
between 2 trebles, repeat, making 5 picots around the shell,
a double in single treble; repeat.
Work around the armscye in same way.
Child’s Coat Sweater
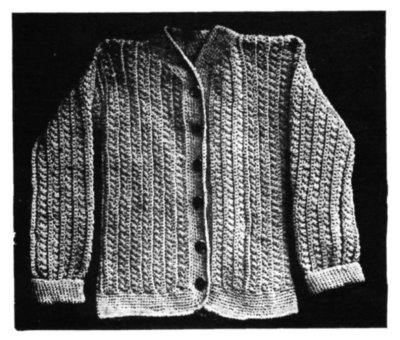
Child’s Coat Sweater
Use Germantown wool, cream-white or any color desired,
and bone hook size 4, or a hook large enough to
carry the wool easily. The sweater is crocheted in the
length in two parts, and is joined in center of back.
Make a chain of 160 stitches, turn.
1. A double in each stitch of chain, chain 1, turn.
2. A double in each double, working in back vein of
stitch to form a rib.
3. Make star-stitches along the rib, thus: Chain 3,
draw a loop through 2d and 3d stitches of chain, counting
from hook, and a loop through each of 2 doubles; take up
wool and draw through the 5 stitches on needle, chain 1 to
close the star, draw a loop through eye of star just made
(under the 1 chain), another through the back part of last
perpendicular loop of the same star, and a loop through
each of 2 doubles, close the star by working off all the loops,
chain 1, and repeat to end of row, turn.
Make another rib of doubles by working across twice,
then a row of star-stitches, and continue until you have 4
rows of stars and 5 ribs; on next row work 39 stars, then a
rib, and continue until you have 3 rows of 39 star-stitches
each. Work a row of doubles, break and fasten the wool
securely. Bear in mind that the star-stitches must be all
worked on the right side; the 1st row will come so, but the
2d will not unless the wool is broken off at the end of 2d rib
and fastened in at other end again; then chain 3, and proceed
with the row.
Beginning at the neck-end of the front strip, leave the
1st 6 stitches (equal to 3 stars) and work to end of row in
star-stitch; make a rib as directed. Work 2 more rows of
stars, with the ribs alternating, leaving 1 star less at the
top or neck-end each time.
Work the other half to correspond, then join in center of
the back with single crochet, putting hook through a loop
of each part. If carefully done the joining will not be discernible.
Join under arms, also, leaving the opening for
armholes.
For the border: Work 10 rows of double crochet, a
double in each stitch, around the entire garment, fronts,
bottom and neck, widening at each of the lower corners in
each row to form the miter. Or, if preferred, work
around neck and down fronts first, completing the border;
then work around the bottom and across the front border.
The widening for miter is neater. The buttonholes are
made in the 5th row of front; chain 5, miss 5, and repeat,
making as many openings as desired, at equal distances.
In working back, next row, make also a double in each
stitch of 5 chain.
For the sleeve: Chain 80 stitches, with 1 to turn, work
a rib of doubles on the chain, then 40 star-stitches. Repeat
until there are 10 rows of star-stitch and 11 ribs, taking
care, as before, that the stars are worked on the right side
always. Join the sleeve-seam on the wrong side with single
crochet, as you did the back.
For the cuff: Work 12 rounds of double crochet, 1
double in each stitch and turn back. Sew the sleeves into
the armholes, and sew on buttons of a size appropriate to
the garment and corresponding with the buttonholes.
This sweater may be very easily enlarged to any desired
size by starting with a longer chain and making more
rows of star-stitch and ribs to keep the proportion. The
combination of stitches is a most attractive one.
Child’s Jacket
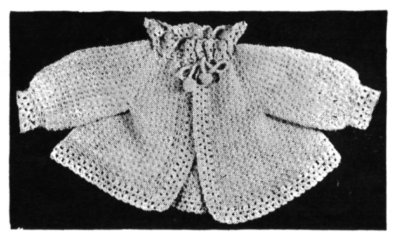
Child’s Jacket
Materials required are three skeins of cream-white
Saxony and one skein of blue or pink, with a bone
hook of suitable size to carry the yarn smoothly.
Make a chain of 78 stitches.
1. On the chain make 8 stars, widen, (1 star, widen, 9
stars, widen) twice, 1 star, widen, 8 stars. Break and
fasten wool, and fasten in again at beginning of row so as to
have all stars made on the right side. Or, one can work
back with a row of doubles to beginning of 1st row.
2, 3, 4, 5, 6, 7, 8. Same as 1st row, except that you
widen only every other row, and always exactly in the center.
Keep 8 stars on each front, thus constantly increasing
the upper portion of the sleeve, or gore between 1st and 2d
and 4th and 5th widenings.
9. Make 8 stars, chain 22 for armhole, fasten in 1st
star on the back, continue the stars across the back, chain
22, and make 8 stars across front again.
10. Same as preceding row, making 11 stars on chain
under each arm.
11, 12, 13, 14, 15, 16, 17, 18, 19, 20. Same as 10th row,
widening only in center of back every other row, as at
first. This completes the body of the jacket.
21. Commencing the border, fasten in the colored wool
at left front corner of neck, and make 21 stars down the
front. At the corner make 2 stars as if to widen, in order
to turn the corner neatly, and continue all the way around
to top of right front, not widening at all in the back of
border, but making 2 stars to turn the corner as at first.
22. Stars all around, of color.
23. Fasten in the white wool at top of left front, chain
3, then make 2 trebles in the eye of each star all around,
with 4 trebles in eye of star at corners, so as to make the
work lie smoothly.
24. With color, fasten in at top of left front, chain 3,
and make 2 trebles between each 2 trebles of last row, with
4 at corners.
25. Same as 24th row, with white wool.
26. Across top of neck make spaces of trebles, separated
by 2 chain, in which to run cord or ribbon.
27. Also with white, make 2 trebles in every space.
28. With color, make 2 trebles between each group of
last row.
29. Like 28th row, with white. This completes the
collar.
30. Fasten color at top of left front, * chain 4, fasten in
space between trebles, repeat from * around the jacket,
collar and all; fasten off neatly.
For the sleeve:
1. Fasten wool where you started the underarm chain,
make the required number of stars (not
widening) across shoulder, and 9 stars on the
chain under the arm.
2, 3, 4, 5, 6, 7, 8, 9, 10, 11. Same as 1st
row, making star over star of previous row,
and joining underneath the arm.
12. With color, work the cuff in star-stitch,
only omit taking the stitch under the back
loop of star in last row, and take a loop
through each of 2 eyes of stars instead, thus
drawing in the sleeve, and making only 12
stars in the round.
13. With the color, make star in star.
14. Using white wool, make 2 trebles in eye
of each star.
15, 16, 17. Same as 28th, 29th and 30th
rows of border.
This makes a dainty, soft little garment.
If one likes, treble stitch may be alternated
with star-stitch, on the return rows; that is,
after making a row of stars, instead of breaking
the wool, turn, chain 3, and make trebles
across, or the trebles may be crossed to give
a more fancy effect, making a treble in 2d
stitch, then a treble back in preceding stitch.
Run ribbon matching the colored wool, or cord and tassels
made of both white and color, in the spaces around the neck.
Girl’s Jacket
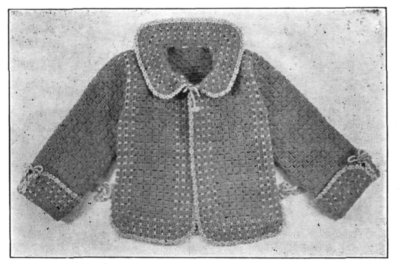
Girl’s jacket
Materials required are 12 skeins of gray Germantown
yarn and 1 skein of blue. Make a chain of
52 stitches.
1. A double in 8th stitch of chain, * chain 3, miss 3, 1
double in next; repeat from * 10 times, making 12 loops
in all, turn.
2. Chain 4, 3 trebles in 1st loop, * chain 1, 3 trebles in
next loop; repeat from * across the row, ending with 4
trebles, turn.
3. Chain 4, a double under 1 chain, * chain 3, a double
under next; repeat to end of row.
Repeat 2d and 3d rows 23 times, making 24 rows of
blocks in all, alternating with rows of loops. Divide the
width into three parts, 4 blocks for back of neck and 4 for
each front. Work same as 3d row until you have made
4 blocks, the last block of 4 trebles, turn and work back
same as 3d row. Repeat these 2 rows twice more; in
next row, to widen, make 6 trebles under 4th loop, chain
4, turn, miss 3 of 6 trebles, a double between next 2,
chain 3, fasten under 1 chain, and continue across.
The next row will consist of 5 blocks, and there are 20
rows of 5 blocks each, in all, making the same length of
back. Make the other front in exactly the same way.
For the border:
1. Fasten in at corner of neck (at end of 1st row of 5
blocks), work in blocks down the front, across the bottom,
putting 3 extra trebles at each corner to turn smoothly, up
over shoulder and down back, and so on around to opposite
corner, omitting the stitch between blocks.
2. Fasten blue yarn at right front and work a row of
loops as described, fastening the chains between groups of
3 trebles.
Make 3 more rows of blocks, same color as body of
jacket, with always the 3 extra trebles (6 in all) at corners
to turn, and following the 2d and 3d rows with the row of
loops in blue.
For the sleeve: Fold the jacket evenly and fasten yarn
at the back of jacket, at the desired width for sleeve—9
blocks from top of shoulder, in the model; chain 9, fasten
to front, work around armhole with a row of loops (gray),
making 21 loops in all, 3 under arm, chain 3, 2 trebles
under 1st loop, chain 1, 3 trebles under next loop; repeat
around, join, and repeat the rows of loops and blocks to
required length; the model has 25 rows of blocks, ending
with the row of loops.
For the cuff: Leave 7 blocks on top of sleeve, fasten in
8th loop (the 3d from center loop at top of sleeve), work
around as usual to 3d loop from center on other side, turn,
make a row of loops, then a row of blocks. Fasten the blue
yarn to sleeve, and work around cuff with loops; make a
row of blocks with 6 trebles at corners to turn, and continue
to match border of jacket, making 4 rows of blocks
and 3 of blue chain-loops.
For the collar: Fasten yarn at corner of neck, in 1st
block made in border, and make 3 trebles in the same
place, make a block in the side of each 3 following blocks,
along the neck toward the back, putting chain 1 between,
2 blocks in side of next, to widen, 6 blocks, widen, 3 blocks.
Follow with a row of loops, and continue same as for cuffs,
widening as directed and twice putting 6 trebles under
each of 2 consecutive loops in outer row. Join at
beginning and end of each row to upper edge of
jacket-border.
Finish with a border of loops, as follows: A double
between blocks, (chain 3, a double in same place)
twice. Crochet a chain of the blue yarn and use this
to lace under the arms, finishing the ends with loops
as for the edge, and tying in a bow. Make a shorter
chain for each cuff, lace together and tie in a little
bow to the sleeve. A similar chain is used to draw
in the neck.
Any preferred colors may, of course, be used. The
jacket can be easily made large enough for an adult,
and is beautiful in blue-and-white Saxony for a baby.
Babies’ Jacket
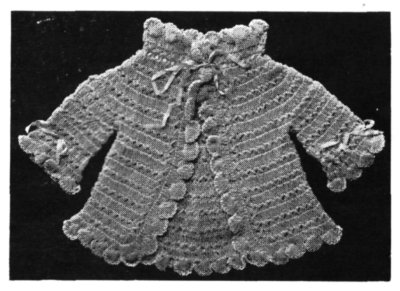
Babies’ Jacket
Materials required are three skeins of Saxony
yarn, one spool silk-finished crochet-cotton or
crochet-silk, and two and one-half yards of No. 1
ribbon. Use a hook which will carry the yarn easily.
Make a chain of 100 stitches, turn.
1. Miss 1st 4 stitches, make a treble in each
of 96 stitches, drawing up to about five-eighths of an
inch. Break and fasten wool (this so the work will be
done on the right side; one may turn, if preferred, but the
effect is not so good).
2. Fasten in where you began, pull up, make 2 trebles
in top of 3d treble and 1 treble back to where you fastened
in, which makes a cross; repeat, making 32 crosses in all;
break thread and again join in at the end where you began.
3. Make 21 trebles over 7 crosses, (12 trebles over
next 2, 18 trebles over 6 crosses) twice, 12 over 2, and again
21 over 7, which brings you to end of row. The 12 trebles
over 2 are to widen; the others are made 2 on each cross
and 1 between.
4. Same as 2d row, 38 crosses.
5. Make 21 trebles plain (that is, 3 over each cross).
24 over 4 crosses, 21 plain, 12 over 2 crosses, 21 plain, 24
over next 4, 21 plain.
6. Forty-eight crosses.
7. Make 21 plain, 12 over next 2 crosses, 12 plain,
(12 over next 2, 24 plain) twice, 12 over next 2, 12
plain, 12 over next 2, 21 plain.
8. Fifty-eight crosses.
9. Make 24 plain, miss 12 crosses, 24 plain, 12 over
next 2, 24 plain, miss 12 crosses, 24 plain.
10. Thirty-six crosses.
11. Plain, with 3 extra trebles under each arm, and 6
extra over the 6 crosses at center of back.
12. Forty crosses.
13. Plain, with 6 extra in back.
14. Forty-two crosses.
15. Like 13th row.
16. Forty-four crosses.
17. Like 13th row.
18. Forty-six crosses.
19. Plain, without widening in the back.
Around the neck make spaces for the ribbon by fastening
in at end of foundation-chain, chain 5, miss 2, a treble
in next, * chain 2, miss 2, 1 treble, and repeat. Now make
a row of crosses entirely around the jacket, putting extra
crosses at corners to keep the work flat, follow this with a
row of trebles, widening by making extra trebles at corners
to turn them nicely, finish with a row of shells of 8 trebles
in a stitch, miss 3, fasten, miss 3; repeat, and edge with
the crochet-silk, making a double between 1st 2 trebles of
shell, (chain 2, a double between next 2) 6 times, chain 2,
double in double between shells, chain 2, and repeat.
For the sleeves:
1. Make 6 trebles on trebles under the arm, and 36
over the 12 crosses.
2. Fourteen crosses.
3. Plain, with 3 extra trebles under arm, 45 in all.
4. Fifteen crosses.
5. Same as 3d row, making 48 trebles.
6. Sixteen crosses.
7. Same as 3d row, making 51 trebles.
8. Seventeen crosses.
9. Same as 3d row, making 54 trebles.
Finish with shells and chain-loops, as described for the
body of jacket. Run one and one-fourth yards of ribbon
in the neck, and divide the remainder, running it in the 7th
row of sleeve and making a pretty bow on top.
Baby’s Shoes in Crochet
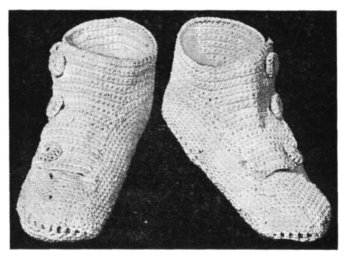
Baby’s Shoes in Crochet
These little shoes may be made of crochet-cotton, or
silk, white or delicate color, or of wool. They are very
firm and neat, and shaped to the foot. The sample pair
was made of No. 15 crochet-cotton; finer or coarser material
will result in a smaller or larger shoe, by the same directions.
Commence at bottom of the sole with a chain of 33
stitches.
1. Miss 1st stitch, a double in each of 31 stitches, 3 in
end stitch, 1 in each of 31 stitches down other side and 3 in
last, join.
2. A double in 1st stitch, 2 in next, 1 in each double
down the side to within 2 stitches of middle of toe, 2 in next,
1 in next, 3 in middle stitch, 1 in next, 2 in next, 1 in each
down side, ending with 2 in 3d stitch from middle of heel, 1
in next, and 3 in next, join.
3. Chain 1, a double in each of 2 stitches, 2 in next, 1 in
each down the side to within 4 of the end, 2 in next, 1 in
each of 3, 3 in middle stitch, 1 in each of 3, 2 in next, 1 in
each down side, 2 in 4th stitch from the end, 1 in each of 3,
2 in middle stitch of heel, join.
4. Same as 3d row, making an extra stitch between
widenings.
5. Chain 4, miss 1, a treble in next, chain 1; repeat,
making 2 trebles with 1 chain between in each of the widenings
of the toe, and 3 trebles, with 1 chain between, at back
of heel.
6. Chain 1, a double in each stitch all around, making 2
doubles in the widening spaces at side of toe and in the
middle of heel.
7. Chain 1, a double in each stitch around, widening as
usual on each side of toe and in the middle, also in middle
of heel; join.
8. Same as 7th row.
9. Chain 4, * miss 1, a treble in next, chain 1; repeat
around, join to 3d of 4 chain.
10. Chain 1, a double in each treble and in space; narrow
11 stitches from middle of toe by putting hook through
2 stitches at once, or by missing a stitch, also at middle of
toe, join.
11, 12. Same as 10th row, making double in double, and
narrowing as directed.
13. Like 11th row until you have reached the 3d narrowing
on the vamp, then turn and work back across vamp,
narrowing at the end, turn.
14. Chain 1, a double in each double across vamp, narrowing
in the middle and at end.
15, 17. Like 13th row.
16, 18. Like 14th row.
19. Chain 1, a double in each double, narrowing at middle
of vamp and on the sides.
20. Turn and work across top of vamp with a double in
each stitch.
21. For the upper part of shoe, slip to 1st double at side
of vamp, 2d row back, chain 11, turn, miss 1, 10 doubles in
10 stitches, catch in 1st double of side of shoe, a single in
next double on side of shoe, turn; a double in each of 9
doubles, 2 in last, turn; chain 1, 2 doubles in 1st double, 1
in each following double, join to next double of side, a single
in next, turn; a double in each double of last row, with 2
at end, turn; chain 1, a double in each of 2 doubles, chain 5,
miss 5, a double in each following double, join to next
double of side, a single in next, turn; double in each double,
with 5 in 5 stitches of chain, turn; chain 1, a double in each
double; join, slip in next double of side, turn; work 5 more
rows, widening 1 stitch at end of every other row; then
chain 4, turn; miss 1, a double in each of 3 stitches and
double in each double, join, slip in next double, turn; work
back with double in each double, chain 1, turn, 2 doubles
in 2 doubles, chain 5, miss 5, double in double, join, slip in
next double, turn, work back with double in double, chain
1, turn, and work double in double around to within 14
stitches of top of vamp on other side, turn; chain 1, double
in double to edge of flap, turn; chain 1 and make a double
in double around to the other side. Continue thus until
you have worked 6 rows around top of shoe, then make a
buttonhole as before, and finish with 4 rows. The shoe
may be made higher, if desired, and more buttonholes
added.
For the buttons. Chain 3, join; 8 doubles in ring; 2
doubles in each double; a double in each double; a double
in every other double; slip in a pearl or porcelain button of
requisite size, draw together, and sew to the shoe, matching
the position of the buttonholes.
Ribbed House-Slippers
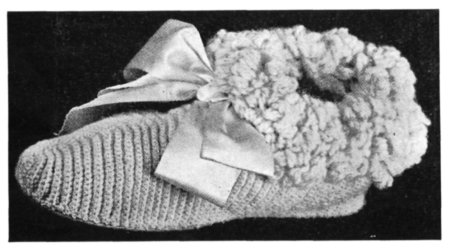
Ribbed House-slipper
Use 2-fold Shetland zephyr, or any similar yarn of moderate
twist. Commencing at the toe, make a chain of
11 stitches, turn.
1. A double in 2d stitch of chain and 1 in each of 8
stitches, 3 doubles in end chain, 1 double in each of 9
stitches down other side of chain, in same stitches where
the 1st 9 doubles were worked, chain 1, turn.
2. Ten doubles in 10 doubles, taking up back vein of
stitch to form the rib, 3 doubles in next, or center stitch, 10
doubles in 10 doubles, chain 1, turn.
3, 4, 5. Same as 2d row, making 1 extra double each
side of center, each row.
6. A double in each double, without widening, chain 1,
turn.
7. A double in each double, with 3 in center stitch.
Repeat 6th and 7th rows until you have 25 ribs, or the
vamp is as deep as desired. If preferred, the widening may
be made every row, putting 2 doubles in one and then the
other, alternately, of the widening doubles.
For the side of foot make 24 doubles in 24 doubles, chain
1, turn, a double in double, chain 1, turn, and continue
until you have 44 ribs, or the strip is of sufficient length to
extend easily around the sole; join neatly to 24 doubles on
opposite side of vamp.
Around top of slipper work a beading in which to run the
elastic, thus: Fasten in, between 2 ribs, chain 10, * miss 5
ribs, a triple treble (over 3 times) between next 2, chain 1,
a triple treble between next 2, chain 5, repeat from *
around, ending with 1 triple treble, chain 1, join to 5th of
10 chain.
For ruching: Have 3 strands of yarn, insert hook in
work, over 4 times, pull through, and repeat in each stitch,
pulling the loops out about three-fourths inch, and always
taking yarn next to you to next stitch; make this for bottom
of beading, as well, and the latter will be entirely
covered. Run an elastic band or tape in the beading, between
the 2 triple trebles, and make a bow of ribbon for
instep of the same shade as the yarn.
Baby’s Bootees
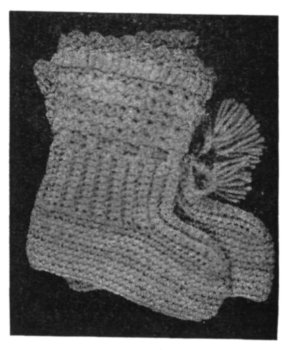
No. 1. Baby’s Bootees
A pair of dainty bootees makes a nice gift for baby,
and is appreciated scarcely less by baby’s mamma.
Two very pretty styles are given, one in pink and white, the
accepted colors for a girlie, the other in blue and white—blue
being the color usually chosen for a little son’s belongings.
Commencing with white Saxony, make a chain of 11
stitches, turn.
No. 1. 1.—Miss 1 stitch, a double in each of 10
stitches, turn.
2. Chain 1, a double in each of 10 doubles, taking up
the back loop of stitch to form a rib, turn.
Repeat 2d row until you have 8 ribs; at the end of the
last row chain 11, turn, miss 1, a double in each of 10
stitches of chain and in 10 doubles, chain 1, turn, and continue,
making 4 of the long ribs, then, working only on the
10 doubles, make 8 more short ribs, and join at the back of
the leg to the foundation chain, taking into each stitch.
For the upper part of leg:
1. Chain 3, and make trebles all around, 38 in all, joining
to top of 3 chain.
2. Draw out the stitch on needle, pull up a loop through
1st and 3d stitches of preceding row, take up the yarn, and
draw through the 3 loops on the needle at once, chain 1 to
close the cluster, * draw up a loop in same place with last
and another in 3d stitch, work off as before and repeat
around.
3. Draw out the stitch on needle, take a loop in the
space before pineapple-stitch of last row and another in the
space after, work off as before, take a loop in same space as
before, another in next space, work off, and repeat.
4. Like 3d row, with blue.
5, 6. Like 3d row, with white.
7. With blue, a double in each stitch.
8. With white, chain 3, a treble in each
double, join.
9. With blue, make 1 double in 1st stitch,
chain 3, 1 double in same stitch, miss 1; repeat.
Fasten off neatly.
For the foot:
1. With blue make a double in each stitch
all around bottom of leg and instep.
2. A double in each double, taking up
both veins of stitch to avoid a rib.
3, 4. Same as 2d row, with white.
5, 6. Same as 2d row, with blue.
7, 8, 9, 10. Same as 2d row, with white, joining
the last row with single crochet on the
wrong side. Finish with cord and tassels or
with ribbon, run in and out the 1st row of trebles on
upper part of leg.
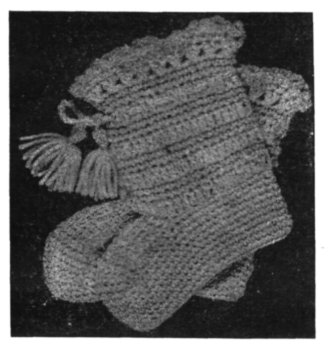
No. 2. Baby’s Bootees
No. 2. Using the white yarn make a chain of 37
stitches, join.
1. Chain 3, a treble in each stitch, join.
2, 3. With pink, make a double in each stitch, join.
Repeat 1st, 2d and 3d rows 3 times, which will give you 4
ribs each of pink and white.
13. Chain 3, with white, miss 1st stitch of last row,
make a treble in next, then a treble back in 1st stitch, forming
a crossed treble; repeat around, join.
14. With pink, a double in a stitch, chain 3; repeat.
Fasten off securely.
For the foot:
1. With white, fasten in the 17th treble from back of
leg, draw up a loop through each of 6 stitches, keeping all
on needle; take up yarn and draw through 1st stitch, *
again draw through 2, and repeat until all are worked off;
now insert hook under the little upright bar formed by
working off the last row, draw up a loop and repeat until
you have again the number of loops on needle; continue
until you have 9 rows of afghan-stitch.
Again using white, fasten at back of leg and make a
double in each stitch of leg and around the instep; make 4
more rows of doubles, 1 in each stitch of preceding row, taking
up both loops to avoid a rib, then 5 rows of pink in the same
way, joining the last row as before directed. Finish with
cord and tassels or ribbon, run in the 4th row of trebles
around top of bootee.
A Sweater and Cap
for Dolly
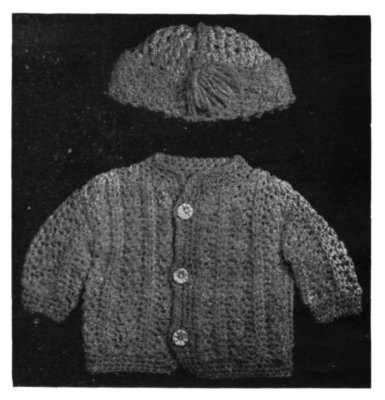
Sweater and Cap for Dolly
One skein of white and blue Saxony will be sufficient for
two sets; use a crochet-hook that will carry the wool
easily. Commence the sweater with a chain of 60 stitches.
1. A double in each stitch of chain, turn.
2. A treble and a double in back of double of last row
(chain 3 for 1st treble of the row), miss 1 double; repeat to
end of row, turn.
3. A treble and a double taken between treble and
double of last row; repeat.
4. A double in back of each stitch of last row (chain 1
for 1st double).
5. Same as 4th row. This completes the portion over
the shoulder.
On one half the length repeat the 2d, 3d, 4th, 5th and
again the 2d row which completes one front. Work in the
same way on the other half of length, which brings you to
the center of the back and makes half of the sweater. Make
the other half to correspond, and join neatly down center
of back. Fold and join under the arms, making the
armscye of desired size.
For the sleeve: Make a chain of 15 stitches, and repeat
from 1st to 5th row; then repeat from 2d to 5th row twice,
and join last row to 1st; also crochet sleeve in the armscye.
Entirely around the sweater make 4 rows of double crochet
with blue yarn, working in both veins of stitch to
avoid a rib, and putting 3 stitches in 1 at corners to turn
smoothly. After working 2 rows of left front make the
buttonholes, separated by 8 doubles, by chain 3, miss 3;
then in next row make a double also in each stitch of chain.
Finish bottom of sleeves in same way, missing every 2d
stitch in 1st row to draw in the cuff a little. Sew on pearl
buttons to match the buttonholes.
Cap: Chain 5, join to form a ring.
1. Chain 3, (yarn over hook, insert hook in ring, take
up yarn and draw through) twice, yarn over and draw
through all the loops on needle, chain 1 to close the “bean,”
make 6 more bean-stitches in ring, and join to top of 1st.
2. Chain 3, and make a bean in top of each of last row,
and between each 2; join.
3. Chain 3, a bean-stitch between each 2 of last row,
widening every 3d or 4th by making a bean in top of bean.
4, 5. Same as 3d row, widening every 5th bean, or as
necessary in order to keep the shape.
Make 5 more rows without widening, which completes
the body of cap.
For the border, turn cap wrong side out and tie in the
blue yarn, working on the wrong side to form the band so
that it will turn up on the right side.
1. Chain 3, draw a loop through 2d and 3d stitches
from hook, also through next 2 stitches of last row of cap, *
take up wool and draw through all the stitches on needle,
chain 1 to close the star, draw up a loop through eye of star
last made, under the 1 chain, another through back part of
last loop of preceding star, and 2 loops in next 2 stitches;
repeat from *, and continue until you have made 4 rows of
star-stitch. Fasten off neatly.
Make a tassel of the colored (blue) yarn, and attach to
top of cap by a crocheted cord.
This set will make a charming gift for a little girl. By
using fourfold Germantown the sweater will be large
enough for the small mother herself to wear, or it may be
easily enlarged by using the heavier wool and working in
the same pattern on a longer foundation-chain. The cap
may also be made large enough for a child by adding to the
number of bean-stitches in each row.
Child’s Cap in Bean-Stitch
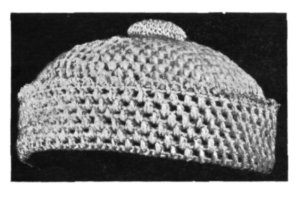
Child’s Cap in Bean-Stitch
Materials required are one skein of cream-white
Shetland floss and a little light-blue Saxony yarn,
with medium-sized bone hook. Chain 5, join.
1. Draw up loop one-fourth inch long, yarn over, hook
in ring, draw loop through, over and draw through 3
loops now on needle, * chain 1, draw up a loop in ring,
over, draw up another loop in ring, over, draw through
all 4 loops; repeat to make 4 more bean-stitches, 6 in all,
with 1 chain between, and join last 1 chain to top of 1st
stitch.
2. Draw loop up long over 1st bean-stitch, over, hook
through same stitch, draw through, over and draw through
all the loops; this is 1st stitch of each row. Chain 1, a
bean-stitch in following space, chain 1, bean-stitch in bean-stitch;
repeat around, join.
3. Bean-stitch in 1st stitch, in each space and every 3d
bean-stitch, with 1 chain between, join.
4. Same as 3d row, with bean-stitch over every 4th
bean-stitch.
5, 6, 7, 8, 9, 10. Same as 4th row, with an additional
space between widenings; in 5th row make a bean-stitch in
every 5th, and so on, with bean-stitch in every 10th, in
10th row.
11, 12, 13. Bean-stitch in each space.
14. Change to double crochet for head-band, making a
double in each stitch.
15, 16, 17, 18, 19. A double in each double, working in
both veins of stitch; narrow twice in each row.
20, 21. Double in each double.
22. A bean-stitch in each 2d double, 1 chain between.
23, 24, 25, 26, 27. Bean-stitch in each space; fasten off
white yarn.
28. Fasten blue yarn in space, chain 4, draw up a loop
in 2d chain from hook, 1 in 3d and 1 in 4th, all rather long
loops, over, draw through all 4 loops, chain 1, fasten in next
space with a single, and repeat. This makes a small,
pointed scallop and finishes edge of cap.
For the button: Using the blue yarn, chain 3, 8 doubles
in 2d stitch of chain. Continue around and around without
joining, 1st row with 2 doubles in each stitch, then
widen sufficiently to keep the work flat until nearly as
large as the button you wish to cover; after one or two
more rounds, decrease by working off 3 loops instead of 2,
slip the button in and continue, keeping the work tight
over the button until you have about half of space covered;
then break the yarn, draw up with needle and sew to center
of crown.
This cap is large enough for a little boy or girl of three
years, and may be easily enlarged. The border may be
turned down over the ears for extra warmth.
Child’s Crocheted Hood

Child’s Crocheted Hood
Use eiderdown or very heavy Germantown worsted, with
a hook large enough to carry the wool without fraying.
Chain 4 stitches, join.
1. Chain 3, draw a loop through 2d and 3d stitches of
chain, and 2 through the ring; take up wool and work off all
together, chain 1 to close the star, draw a loop through eye
of star (under 1 chain just made), another through back
part of last loop, and 2 in ring; work off as before, and repeat
until you have made 6 stars; join.
2. Make 12 stars in the row, taking the 4th loop of each
star in same stitch with last stitch of preceding star, and 5th
in stitch ahead, so that you get 2 stars over each star of
preceding row.
3. Make 16 stars, widening 4 times.
4, 5, 6. Leave 4 stars for back of neck and work back
and forth for 3 rows. Break wool at end of each row and
fasten in at beginning, so the stars will come on the right
side; chain 3, draw 2 loops through 2d and 3d stitches of
chain, then proceed as usual.
Make 4 rows of doubles around the lower edge, then a
row of stars entirely around the hood, widening by putting
an extra star at each corner of front to prevent drawing.
For the rosette: Chain 3, join; chain 7, * a double
treble in ring, chain 3, repeat from * 6 times, and join to
4th of 7 chain. Run ribbon in and out the spaces, sew the
rosette in place, and finish with ties of ribbon.
This hood is easily enlarged, by following general directions,
and any stitch, plain or fancy, may be used for it.
Child’s Crocheted Hood
in Wedge-Stitch
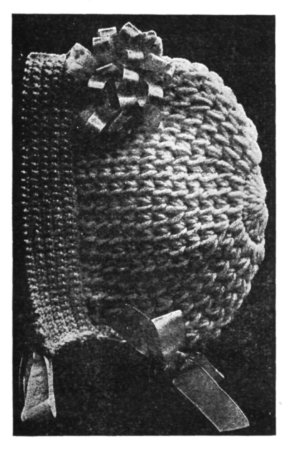
Child’s Crocheted Hood in Wedge-Stitch
Materials required are one and one-half hanks of
4-fold Germantown wool, white, or any preferred
color, and a bone crochet-hook of medium size. While intended
for a small child, this hood may be very easily enlarged
to fit any head.
Chain 4 stitches with white wool, join.
1. Chain 3 for a treble, 19 trebles in ring, join.
2. Draw up a loop, insert hook in 1st stitch, * wool
over, draw up a loop, wool over, hook in next stitch, over,
draw up a loop, wool over, draw through all the loops on
hook, chain 1, insert hook in same stitch, and repeat from *
until there are 19 wedge-stitches in the round.
3. Draw up loop, insert hook in 1st space, draw up a
loop, over, insert hook in next space, draw up a loop, over,
draw through all loops on the needle, chain 1, * insert hook
in same space, draw up a loop, over, insert hook in next
space, draw up a loop, over, draw through all stitches on
needle, chain 1, and repeat, widening by putting 2 stitches
in every 3d of previous round.
4. Widen in every 5th stitch.
5. Plain, that is, without widening.
6. Widen every 3d stitch.
7, 8, 9. Plain.
10. Plain to within 7 stitches of the end; break wool and
fasten in at other end again.
11, 12, 13, 14, 15. Same as 10th row, leaving the 7
stitches for back of neck.
16. Fasten in, chain 3, and work a treble in every
stitch. It is very pretty to use a thread of ice-wool with the
Germantown when making the border.
17, 18. A double in each stitch around bottom or neck
of hood.
19, 20, 21, 22, 23. A double in each stitch across front,
working in both veins of stitch.
Turn back the border, finish with a bow of ribbon at
back, a rosette on top, and ribbon ties.
To make the hood larger you have but to continue
widening the crown until of proper size, which will make
the front proportionally longer and leave the neck wider.
Any fancy stitch may be used in the same way, following
the general directions given.
Child’s Toque in
Wedge-Stitch
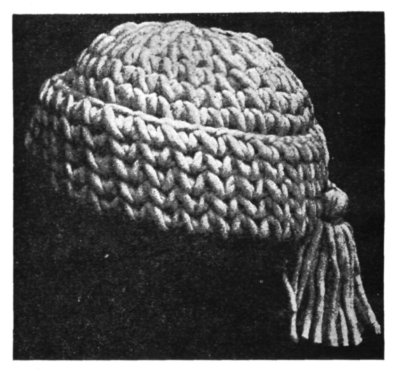
Child’s Toque in Wedge-Stitch
This pretty cap, which will fit a girl of ten to fourteen
years, and is easily enlarged to any desired size, requires
five hanks of eiderdown-wool. If desired, two colors
may be used, say white for cap and blue for the turnover or
border. It is worked in wedge-stitch, and Germantown
wool may be used by making more stitches. Use a bone
hook of suitable size, that is, one which will carry the wool
easily without catching in it. Make a chain of 4 stitches
and join.
1. Draw out the loop, insert hook in ring, draw up a
loop, wool over, insert hook in ring, draw up another loop,
wool over, draw through all the loops on needle, chain 1,
and repeat until you have 11 wedge-stitches in the ring;
join.
2. Draw up loop, insert hook in 1st space, draw up a
loop, wool over, hook in next space, draw up a loop, wool
over, draw through all loops on needle, chain 1, * hook in
same space, draw up a loop, wool over, hook in next space,
draw up a loop, wool over, draw through all on hook, chain
1, and repeat from *, widening by making an extra stitch
in every other stitch of last round.
3. Widen in every 3d stitch.
4. Widen in every 6th stitch.
Work six times around plain, that is, without widening;
then if color is used for the turnover join it in and work
once around, turn the work so that the border will be right
side out when turned up, and work around five times more.
Make a chain of 18 or 20 stitches, according to length you
wish the tassel, wind the wool over four fingers, or a card
five inches wide, 20 times, slip off, tie tightly near one end
to form the head of tassel, and cut open the other end.
EEDLECRAFT pictures each month new
and beautiful pieces of needlework—knitting,
crochet, including the exclusive Mary Card
designs, cross-stitch, embroidery, etc. Such
complete and accurate directions and descriptions
are given that any woman can make
the articles for herself without further instructions.
It explains the stitch to use and shows how to make it.
NEEDLECRAFT will supply you at moderate cost
with transfer-patterns, perforated patterns, or stamped goods for
every piece of embroidery shown. Also many working
charts for Crochet and Cross-Stitch Designs.
NEEDLECRAFT will show you the latest productions
in fashions and will furnish you with the best perfect-fitting,
seam-allowing patterns. From these patterns it is easy
to make garments for yourself that will look like the pictures.
NEEDLECRAFT gives up-to-date ideas for decorating
your home and tells you how to do it at the lowest
cost. An interesting and instructive cooking-article appears
each month. In short, NEEDLECRAFT is a magazine
that every woman wants and needs, and is one of the most
practical home-dressmaking and fancy-work magazines published.
NEEDLECRAFT is printed on large presses made
expressly for it and uses the best of new type for each issue.
The paper stock has a high finish in order to bring out clearly
all the details of the fashion and fancy-work illustrations. The
beautifully colored covers are of exclusive design—a very artistic
border with the center panel showing a new piece of
needlework each month. Like NEEDLECRAFT itself, the
covers are different and practical.
A sample copy will be sent you free and postpaid. Just
write your name and address on a postcard and you will receive
a copy by return mail; or, better still, send us 35 cents
and receive the next twelve issues. You are sure to find
those very patterns and designs that you have been looking
for. If you are not more than pleased with NEEDLECRAFT
after reading the first number, tell us so and we will
cancel your subscription and return your money.
Needlecraft
Augusta—Maine
How To Secure Your Yarn
Without Cost
The women of America are knitting as never before. In the social set, no
gathering can be fashionable that does not tolerate knitting; the business woman must
needs knit on the car to and from her work; while to the busy housewife no duty is so
imperative as to exclude knitting from the daily routine. It almost seems as if the
women of America—all women, rich and poor alike—were devoting their united efforts
to one vast universal consecration—the comfort of our boys over there.
There is just one drawback to the fulfilment of this noble ambition that every
woman in America shall devote every spare moment to the knitting of warm sweaters,
stockings, and other comforts for the boys in khaki, and that is—the tremendously
high price of worsted yarns. We can all squeeze out a little more time but we can
none of us spend more money than we have, and in these times the calls for cash
donations are urgent and not infrequent. But now you can have all the yarn that you
will use without spending any money. A little more time is now the only essential to
your doing your bit for the comfort of those who are offering their all for our safety.
You who have been unable to knit as much as you have wanted to, because you have lacked
the means to do with, need feel that drawback no longer. Needlecraft has provided
An assured supply of Knitting-Worsted in the
Regulation Blue, Gray and Khaki which you
can secure without cost by getting subscriptions
to Needlecraft on the following liberal terms:
Send us only 10 yearly subscriptions to Needlecraft at our regular subscription-price of
35 cents each, and we will send each subscriber this paper one year, and we will send you, prepaid,
one one-quarter-pound skein of Knitting-Worsted (Premium No. 6395). (We reserve the right
to provide an equal weight in balls instead of skeins if necessary.)
NOTE—To those who prefer Knitting-Worsted of some other color for a lady’s sweater
or any purpose whatever, we will provide it on the same liberal terms; or if you
prefer finer yarns we will provide Germantown Zephyr at four subscriptions
a skein (Premium No. 6396), and Shetland Floss at three subscriptions a
skein (Premium No. 6397).
Needlecraft
Augusta—Maine